
 Anchor Alarm
SafeAnchor — anchor watch and radar
SafeAnchor is the anchor alarm. It watches your boat while you sleep, and
calls you when something changes.
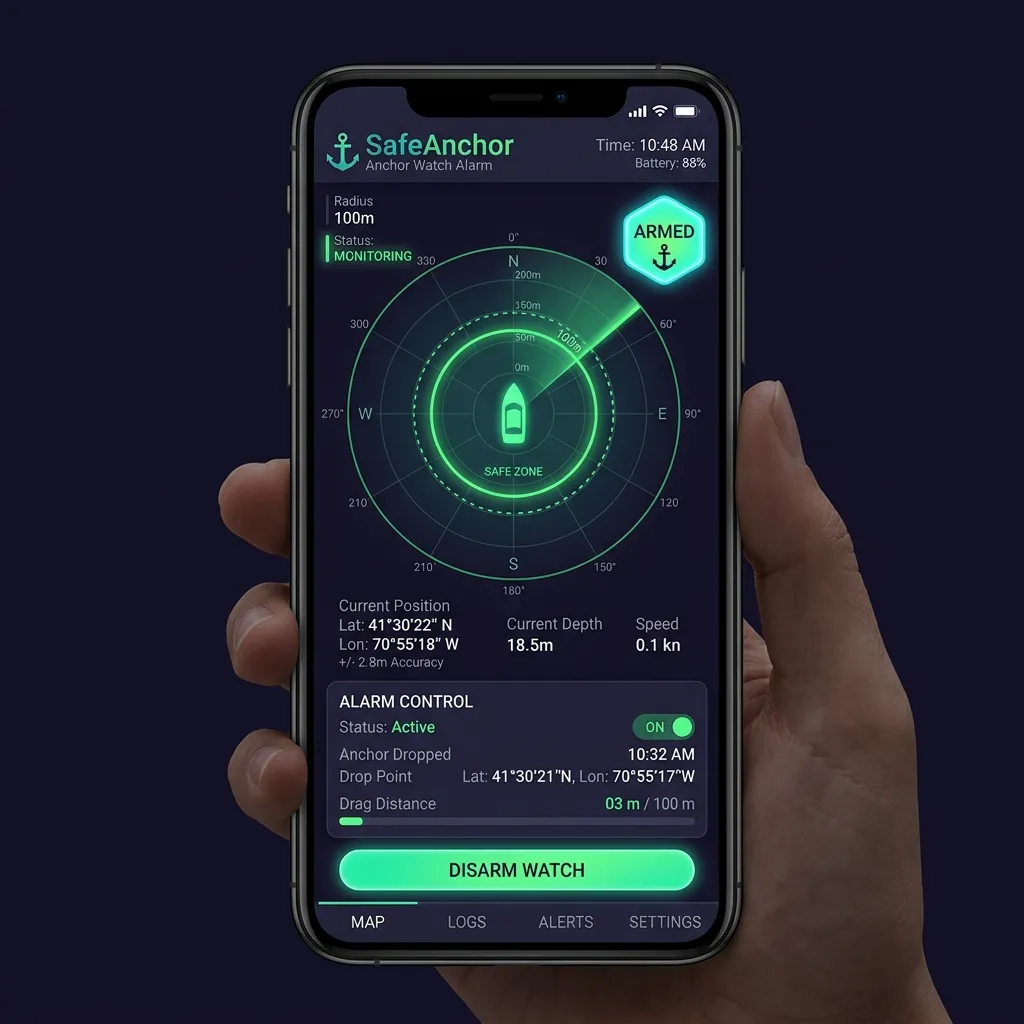
The tab has a bottom pill bar with three sub-modes:
Anchor Watch — History — Radar.
[History](#history) is your past anchorages on the same chart, with a
timeline down the right-hand edge to move through them.
Remote monitoring has its own top-level Remote tab — it is no
longer a SafeAnchor sub-mode.
Apple Watch companion
If AnchorQueen is installed on a paired Apple Watch, the watch is a compact
view and remote for the phone's Anchor Watch. The iPhone remains the
source of the GPS position, the drift calculation, and the alarm decision;
the watch does not start an independent anchor watch.
to the anchor, phone battery, and the age of the last update. Distances use
the short-distance unit selected on your iPhone.
with a press-and-hold confirmation. Pause and resume stay on the iPhone,
where the complete anchor-watch state is visible.
more than 90 seconds old, it changes to a stale state instead of presenting
an old Guarded reading as live.
action means the iPhone accepted the command; the following state update is
the confirmation that the anchor watch changed.
For safety, rely on the iPhone's Critical Alert for a drag alarm. The watch
adds haptic attention while it is connected, but it is not a standalone GPS
or emergency-notification device. Test your paired phone and watch before an
overnight stay, including your chosen Focus and Water Lock settings.
Anchor Watch
The anchor watch draws on the same chart as the rest of the app — the
Chart tab, Capt's Notebook and Merconi all share one map, so
there is no reload when you switch between them.
Opening the anchor watch re-centres on your boat and zooms in close every
time, so the watch is ready to read the moment it appears; with the anchor
already down it frames the swing circle instead. That is deliberate — this
screen answers "where is my boat right now". The Chart tab is not affected: it
keeps whatever you were last looking at, and panning there survives the trip
through Safe Anchor. (The [Radar](#radar) sub-tab is a further exception — it
replaces the chart with its own scope.)
The command buttons and the Anchor Watch / History / Radar pills sit
along the bottom edge of the screen, in the same position as the Chart
tab's own bar, leaving the chart above them clear.
The focused monitor:
Alarm Off.
Anchor, the Alarm On / Alarm Off chip, the Pause Watch /
Resume toggle, and Direct It. (There is no "Test Alarm" button in
this panel — the sound test lives in [Settings → Safe
Anchor](settings.html#anchor-watch).)
To set the anchor:
GPS fix is still noisy, the button changes to Locking GPS… and the
watch waits — the engine averages several accurate fixes and only
then commits the anchor at their centroid. This pre-arm gate is
deliberate: anchoring on a single rough fix would place the pin tens of
metres off and false-alarm as GPS converges. The button returns to
normal once the anchor is locked. (Tap Drop Anchor on an already
accurate fix and it commits immediately, no "Locking GPS…".)
margin for GPS accuracy) and shows a brief toast. Re-tune it any time
by tapping the scope chip to reveal the radius slider.
The first time you drop, iOS asks whether AnchorQueen may use your location
Always. This is the only place the app asks for background location, and it
asks here because a watch that stops at the lock screen is not a watch. Allow it
once and the question never returns.
> Battery. The watch runs the GPS in the background so it can see you drag
> with the screen off. Continued use of GPS running in the background can
> dramatically decrease battery life — the command panel says so before you
> drop, and the same reminder sits under Permissions in [Settings → Safe
> Anchor](settings.html#anchor-watch). For a night at anchor, leave the phone
on a charger.
The watch arms itself the moment the anchor commits — there is no separate
"Arm" step. The scope chip reads Alarm On. If you cross the radius a
continuous siren sounds, the screen flashes, and you receive a
notification. While the app is open, the siren plays at full media
volume — ignoring the ring/silent switch and ringer volume — and keeps
looping until you silence, extend, or disarm.
When the app is in the background or the screen is locked, the siren does
not play — that is by design. Instead the alarm reaches you through a
Critical Alert notification: with Critical Alerts allowed for
AnchorQueen it sounds even when the phone is muted, the ringer volume is
down, or a Focus/Do Not Disturb is on — the strongest alert Apple allows
an app to send, reserved for the anchor-drag and man-overboard alarms. (The
shallow-water / grounding alarm is deliberately not in this group — it is
a silent, on-screen alert; see [Grounding alarm](#grounding-alarm).) iOS asks
for this permission in the same dialog as
regular notifications the first time you arm a watch; if you decline (or
turn it off later in *Settings → Notifications → AnchorQueen → Critical
Alerts*), the alarm falls back to a Time Sensitive notification that
pierces Focus and Sleep modes but respects the mute switch. Either way, an
unacknowledged alarm re-posts every 30 seconds for 5 minutes, so a missed
first banner is not the last one. Opening the app from the notification
resumes the full-volume siren and the on-screen controls (see
Troubleshooting → My alarm didn't sound).
The anchorage on the chart
The anchored overlay adapts to how far you're zoomed in. Fully zoomed
in you see everything: the swing rings with their distance labels, the
red warning ring, the heading fan, the wind / gust / wave arrows, the
tether with its distance pill, the info card (vessel, captain, drop
time, seabed, depth) and the GPS-quality badge. As you zoom out these
elements fade away in order of detail — labels first, then the
inner rings, arrows and card — until a distant view shows just the
anchor symbol and the outer swing ring. Zoom back in and they return.
Nothing is lost: the watch itself never changes with zoom, only how
much detail the chart draws.
Past anchorages (the sepia SafeAnchor badges — the anchor and sonar
arcs of the original SafeAnchor.net app on an aged disc) follow the same
rule: at close zoom they carry their date and vessel label, further out
they shrink to the bare badge, then a small sepia dot, and on an overview
chart they hide entirely.
If you anchor at the same spot again and again, the chart shows only
your three most recent stays there; the newest marker carries a
+N badge counting the older ones it stands in for. Nothing is
deleted — every stay stays in your history, and an older marker
reappears if a newer one is removed.
A red GPS LOST / GPS Poor badge is exempt — signal trouble stays
visible at any zoom.
The alarm radius is drawn to be seen. The green swing ring is a solid,
dark-haloed line and the amber warning ring is a bolder dash, so the boundary
your alarm actually fires on stays readable over pale sand, bright depth
shading and satellite imagery alike — not just over dark water.
Re-anchoring at a past spot
The sepia SafeAnchor badges are your own past anchorages. Tap one and a
Previous Anchorage card opens with what was recorded there — place name,
vessel, when you dropped, how long you stayed, and the scope, depth and radius
you used.
Past anchorages on the rail
The same history lives on the chart's content rail
as Past Anchorages, a cell in the captain's family beside Captain's Marks
with the number of stays you have kept. Open it and every stay is a row,
newest first: the badge, the place (or your vessel and the date), when you
dropped and weighed with the length of the stay, and how far it is from
here. Tap a row and the chart flies there and opens the Previous
Anchorage card — re-arm on the exact spot, or open the full record. Tap
the ▶ and the same card opens on its Previous Anchorage fly-by tab, the
stay playing inline from the drop to the weigh (⤢ Full screen takes it to
the whole display). Tap the ♥ to make the stay a
favourite: it wears a ❤️ badge on the chart at every
zoom, appears first in Search, and follows your account to your other devices.
The panel narrows. The search field matches a place, a boat, a year
(2019) or a month (aug) — accents don't matter. On chart keeps only
the stays inside the current view. A year heading sits between seasons
in the list; tap it to narrow to that year, tap again to release. The
[History](#history) timeline's calendar sets the same window, and the chip
that names it (2019, Aug 2019) appears here with an ✕ to clear it. The
stay under the timeline's cursor is highlighted in the list and scrolled
into view. Clear filters puts everything back. The footer reads
"Showing 12 of 87" while anything is narrowed.
Auto-Set Anchor Here re-arms the watch on that exact drop point with those
same settings. Use it when you have come back to a berth you know.
> The safe zone opens to include where you are now. You are almost never
> sitting exactly on last season's pin when you tap it — you are lying to your
> chain some distance off. AnchorQueen therefore widens the swing radius to
> whichever is larger: the radius you recorded, or your present distance from
> that drop point plus an allowance for GPS accuracy. Without that, the watch
> would arm with your boat already outside its own circle and the alarm would
> sound within seconds. A short confirmation tells you the radius it settled
on, and whether it had to widen it.
If the recorded stay came from an older version of the app it may not have kept
your scope and depth, in which case AnchorQueen falls back to safe defaults and
the widening above is what makes the zone fit. Re-tune it any time from the
Alarm On chip or the GPS HUD's anchor chip.
Pausing vs lifting
Two controls change a live watch without re-dropping the hook:
keeping the anchor pin, the swing rings, and the recorded track on the
chart. Tap it to Alarm Off when you want to stop the alarm but stay
set — for example while you re-tune the radius. Tap it back to Alarm
On to resume guarding. (Same effect as the Pause Watch / Resume
toggle.)
Pausing and lifting both ask you to confirm, because each stops protection.
Resuming and the very first drop happen immediately — they only add
protection.
When the drag alarm fires
A full-screen Anchor Dragging alert takes over the display. It shows
your current distance from the anchor, the safe-zone radius, and how long
the alarm has been active. Two actions:
first shows a confirmation that previews the change: how far you are
past the current zone now, and the new radius the watch will resume at
(your current distance plus a 25 % margin). Confirm to grow the zone
and re-arm; the watch never goes blind.
rings stay on the chart, but no further drag alarms fire until you
re-arm. Use this when you've decided the position is fine or you're
about to re-set the hook.
> Two Extend buttons, two amounts. The full-screen alert above grows
> the zone to your current distance + 25 %. The Extend action on
> the lock-screen notification is a fixed +10 m instead — a quick,
> one-tap nudge you can make without opening the app. So tapping Extend on
> the lock screen widens the radius by 10 m, not by 25 %; open the app and
use the full-screen Extend Safe Zone if you need a larger jump.
Grounding alarm
Separate from the drag alarm, AnchorQueen watches the water under your
keel. On every position fix it estimates your under-keel clearance and
warns when it drops below your safety margin (default 0.5 m, adjustable in
Settings). Clearance is resolved from the
best source available — a live NMEA depth sounder first, then charted
soundings, then the offline NavGrid bathymetry — so it still works with no
signal. The alarm message names the source it used (e.g. "navGrid").
When it fires you get a red GROUNDING ALARM banner across the top of
the chart. Unlike the drag and man-overboard alarms, the grounding alarm is
visual only — it plays no sound: the on-screen banner is the alert, so a
glance at the screen is enough. If the app is in the background you still get
a notification, but it arrives silently (no sound, and it does not pierce
mute or Focus). The banner has two actions:
you know you're in a thin-water berth and the warning is expected.
Resume early from Settings → Anchor Watch.
the water gets shallower or you move into a fresh shallow patch, the
alarm surfaces again.
The alert surfaces once per grounding event — it won't fire-storm
while you sit in the same spot. It re-arms automatically once clearance
recovers to safe depth.
Anchored in a separation zone
If you drop the hook inside a charted Traffic Separation Scheme zone, a
red banner warns:
⚠️ Anchored in TSS zone — illegal under COLREGS Rule 10(g)
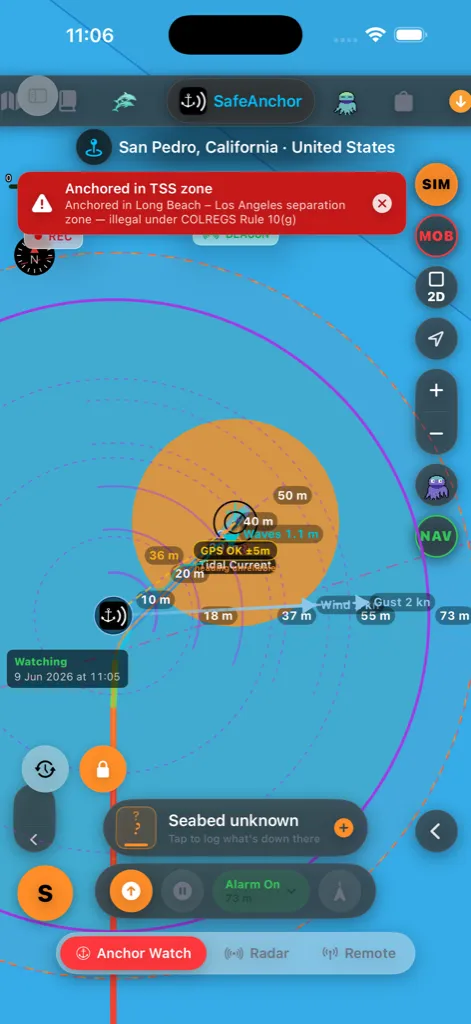
The rules of the road (Rule 10(g)) prohibit anchoring in or near a traffic
separation zone — you would be sitting in the gap that keeps opposing shipping
apart. Weigh anchor and move clear of the zone. The chart's
Traffic Separation Schemes layer shows where the zones are so
you can re-anchor outside one. Turn the warning off (if you have a genuine
reason to ignore it) under
Settings → Nav → Safety Alarms.
Force-quit safety net
AnchorQueen watches your boat with two independent mechanisms working
together. The first is the in-app drift engine — the one you can see in
the radar and the Anchor Watch panel — which runs while iOS is happy to
keep the app alive in the background. The second is an OS-level
geofence: the moment you arm the watch, AnchorQueen asks iOS to
register a circular safety zone at your anchor plus a small margin
beyond your alarm radius. That zone lives inside the operating system,
not inside the app.
What that means in practice:
engine keeps running, the geofence sits dormant as a backup. Normal
case.
in-app engine is gone, but iOS still watches the geofence. The
moment the boat crosses it, iOS relaunches AnchorQueen in the
background, raises the alarm, and sends the notification.
switcher ("force-quit") — same story. The geofence survives,
AnchorQueen is relaunched on a crossing, the alarm fires.
preserved across reboot. AnchorQueen is still on watch.
The two layers run together because each catches what the other
misses: the in-app engine reacts in seconds with sub-metre accuracy
while the app is alive, and the geofence guarantees the alarm still
reaches you when the app isn't.
A green BEACON badge appears under the place name at the top of the
chart whenever that background geofence is live — a quick visual
confirmation that the watch keeps guarding even with the app closed.
Closing and reopening the app keeps the watch. If you quit
AnchorQueen (or iOS unloads it) while anchored, reopening it restores
the whole watch — the armed alarm, the swing rings, the recorded swing
track, and the chart zoom all come back exactly as you left them. The
alarm does not false-fire on reopen; it simply resumes watching.
For this to work, AnchorQueen needs Always location permission and
the system notification permission — both prompted the first time you
arm a watch. See [Settings → Anchor Watch
Settings](settings.html#anchor-watch) and
troubleshooting if either
prompt was missed.
> The honest limit: iOS can guarantee the relaunch only while the
> device has power, a GPS or cellular fix, and you have not disabled
> location services for AnchorQueen. Airplane mode, a flat battery, or
> revoked permission defeats both layers — there's no way around
> physics. We surface a persistent "Anchor Watch armed" notification
> while the watch is live so a quick glance at the lock screen
confirms the safety net is in place.
Lock the anchor
Once set, the anchor pin is locked by default (orange anchor button
with a small padlock badge, bottom-left of the chart) so panning or
zooming the chart can never drag it by accident. To reposition the
anchor by hand, tap the button to unlock — a dashed amber ring with
four arrows appears around the anchor pin to show it is now draggable —
drag the pin, then tap the button again to re-lock (the ring
disappears).
Confirmations
Because these actions change a live watch, AnchorQueen asks you to
confirm before:
anchor and rings stay put).
already active.
Re-arming (resume) and the very first drop happen immediately — they
only add protection.
Drift forecast
Tap the clock button (bottom-left) to open the forecast scrubber.
Drag the slider — or press play — to sweep a ghost of your boat through
past → now → forecast. The past comes from your recorded swing
track; the forecast projects where the boat will lie under the hourly
wind and current.
The scrubber is laid out in rows so it never runs off a narrow screen:
the status label (NOW / PAST / FORECAST) and the time sit on top, the
slider gets a full row of its own, the tier ladder follows, and the
transport buttons — play, honeycomb, ⓘ, and dismiss — sit on the row
below.
The slider is split in half: the left half is your recorded past, the
right half is the forecast, and the green tick in the middle is now.
That keeps even a short anchorage's history easy to scrub instead of
crushing it into the far edge. To jump straight back to live, tap the
green tick, release the knob near it, or tap the status label (NOW /
PAST / FORECAST). The forecast half gives fine control over
the next few hours and compresses the distant outlook, so a long
forecast stays easy to scrub; the time label shows the lead (e.g. +14h,
+2d3h) as you go.
How far ahead you can look depends on your plan:
The slider spans exactly your plan's reach, and a three-chip tier
ladder under it (Free · 1h / Pro · 12h / Max · 3d) shows the longer
windows the higher plans unlock. Your current plan's chip is ringed; tap
a locked chip to open the Store and upgrade.
sit* at the scrubbed hour — green = less likely, red = most likely
— widening further into the future as uncertainty grows. Toggle the
honeycomb with the hexagon button without leaving the forecast. While
the forecast is scrubbed, the same honeycomb also lights up on the
[Radar screen](#radar).
teal). Tap the ⓘ button in the scrubber for the full colour key
and the weather's update time.
The forecast needs marine weather loaded — open the Meteo tab once
if the arrows or honeycomb don't appear.
Anchor watch in 3D

While a watch is armed, a glowing 3D button sits beside the forecast
clock and the anchor lock. Tap it to see the anchorage over real terrain:
the alarm ring (red) painted on the seabed, the same three zones the chart
draws.
bright, so the line reads as a clock.
length and lying bow-to-the-anchor, with a dotted rode back to it. Scrubbed into the past it turns cyan; into the forecast, purple.
A green beacon marks the live boat whenever the head is elsewhere.
The scrubber along the bottom is the chart's forecast timeline in 3D:
past → NOW → forecast. NOW is the green tick in the middle; release the
head near it and it snaps back, or tap the NOW / PAST / FORECAST label or
the Live button. The forecast half gives fine control over the next
hours and compresses the far outlook, as on the chart. Play sweeps the
whole timeline in about twenty seconds. The plan ladder under the slider
(Free · 1h / Pro · 12h / Max · 3d) shows each plan's reach; tap a locked chip
to open the Store.
Scrubbed ahead, the Monte-Carlo honeycomb rises as probability towers:
the taller and redder a cell, the likelier the boat lies there at that hour
(the ramp on the left is the key). Toggle them with the Odds button.
Marine weather is on the page. The strip under the title reads wind and
direction, gust, waves with period, current, pressure and air temperature.
On NOW it is the live report with its update time; scrubbed ahead it is
that hour's forecast, marked in purple. Wind (cyan), gust (orange, dashed),
wave (teal) and current arrows also point from the anchor the way each one
pushes the boat. The weather needs the marine forecast loaded — open the
Meteo tab once if the strip says so.
On the right: distance from the anchor (the big numeral), the bearing the
anchor bears from you,
the margin left to the alarm ring (red when you are outside it), the widest
swing so far and the depth you set, with a Safe / Warning / Dragging chip.
The scene stays live: new fixes, a moved anchor and a fresh forecast reach
it while it is open, and the head keeps the moment you were looking at.
Drag to pan, pinch to zoom and twist to rotate, like any map. Tap the
target button to lock the cockpit view — the anchor ahead, your boat low
in the frame, the view turning only as the boat swings; in that view a drag
orbits the anchor instead of panning, and the recenter button brings you
back. The layers button picks another base map and the boat button flies a
different hull — as in Replay in 3D. There is
no preview timer here; the plan decides how far the forecast reaches. It
needs a connection, like the replay, and the button only appears when the 3D
feature is switched on for your app.
> It is a picture, not a chart. The terrain is land elevation and the
> water is not surveyed depth. Nothing in the 3D view is for navigation — the
anchor watch and its alarm keep running on the chart underneath.
Past anchorages in 3D
The same view works for a stay that is over. Three ways in:
Anchorage sheet carries See this stay in 3D above *Auto-Set Anchor
Here*.
Play button of its player.
— the mark editor offers Anchorage in 3D. It finds the stay recorded
within 60 m of the mark; a mark with no stay behind it shows the anchor
and default rings.
What you see: the anchor and the rings you had set, the recorded swing
fading in from the drop to the lift, and your boat at the scrub head. The
scrubber is the whole stay; it opens on END and the caption under the
title shows when you dropped and weighed. The weather strip and the arrows
follow the head through the reports recorded during the stay — stays
kept from this version on store each fresh marine report beside the track;
older stays show the track and read "No weather was recorded during this
stay". There is no forecast, no live beacon and no plan ladder: this is a
record, not a watch. Swing tracks are kept for 30 days; an older stay still
opens with the anchor and its rings.
Weather pins on the anchor chart
The SafeAnchor chart is the same chart engine as SeaTracker, so any
weather pins you've saved — nearby
anchorages, tomorrow's harbour, the bay around the headland — show their
round weather badges here too, ageing and refreshing exactly as they do
everywhere else. Tap one for its saved report without leaving the anchor
watch.
Man Overboard (MOB)
The red MOB button on the chart (right-edge camera column, in the
Voyage sub-mode) is the emergency control. See also
One tap does everything at once:
the first action in a recovery is to mark where the person went in.
and stops following the boat, so the drop stays centred.
If you were already recording a voyage, it is saved first, then the
crimson track begins — the colour break makes the recovery turn
unmistakable on the chart.
and elapsed time back to a drift-compensated datum (the estimate
of where the person is now, advanced for any surface current, not just
where they went in). It updates live as you steam.
The HUD also carries:
straight into a radio call or hand them to another vessel.
(SAFE / COOL / COLD / DANGER / LETHAL) giving in-water survival
estimates, so the helm knows how much time the recovery has. Sea temp
comes from a connected NMEA sounder first, then the marine-weather
water temperature.
Standing down
When the incident is over, close it with one of three outcomes:
recovery track for post-incident review.
as a drill so they filter out of real-incident lists.
recovery track entirely, as if the button was never tapped.
> The recovery never starts a second MOB while one is live — the button
greys out until you stand the current incident down.
History
Past anchorage details use the full seamark anchorage panel: Scene, Fly-by 3D, photos, weather and tide graphs, stay planning and the action bar. Previous Anchorage adds the saved dates, vessel, duration, depth, scope and radius, plus re-arm and confirmed deletion. Fly-by 3D shows the recorded vessel and anchor rings, with track and captured weather when retained. The other weather and tide views describe current planning conditions.
History is the anchor watch's diary. It is the same chart as Anchor Watch,
with every anchorage the watch has weighed on it as a sepia SafeAnchor badge,
and a timeline down the right-hand edge to travel through them.
History is a subscriber service. The timeline, the memory card, the tour
and the calendar open with a Pro, Max or Remote subscription. On a
Free account the History pill wears a small lock and the sub-mode shows one
card in place of the timeline: your own diary so far — stays, nights,
seasons and places, your last stay, and a small preview of your timeline
drawn from your real anchoring months — what Pro adds, and a Start Pro
button at the live monthly price (it reads Try Pro free when the App
Store grants you a trial). See Max and yearly plans opens the Store.
Nothing else is drawn, and the chart is not flown anywhere. Your stays are
still recorded and kept — the past-anchorage badges stay on the Anchor Watch
chart and the [Past Anchorages rail](#past-anchorages-rail) still lists
them — and the service unlocks the moment a plan, a restore or a purchase on
another device lands, without leaving the screen. Subscribers see a brief
History · included in Pro (or Max / Remote) chip the first time they
enter History in a session.
The timeline. Newest at the top, oldest at the bottom. A hairline and a
year label mark every year; the spine is solid through months you anchored
in and dashed through the gaps, with a dot on each anchoring month — the
more nights, the bigger the dot. Long gaps are compressed, so a season five
years ago has as much room on the slider as last month. The badge is the
cursor; the chip beside it reads the date under your thumb.
from stay to stay, one light tick per stay. The chart flies to each
one and rings its swing and warning circles in sepia; its badge on the
chart wears a cream halo.
fly every few seconds. Any drag, step or calendar tap stops it.
The card. Above the pills: the place (or your boat's name), when you
dropped and weighed with the length of the stay, depth · scope · distance
from here, and your place in the history ("12 / 87"). ▶ opens the stay in
[3D](#anchor-3d-history), playing from the drop; the chevron opens the full
Previous Anchorage record, where Auto-Set Anchor Here re-arms the
watch on that spot.
The calendar. A chip per year with its count; tap one to narrow the
history to that year. Twelve month cells with a bar for how busy each was;
tap one to narrow to that month and see its days. Days you anchored on carry
a dot; tap one and the chart goes there. All time clears the window. The
window applies everywhere at once — the chart shows only those stays, the
timeline stretches to them, and the Past Anchorages panel lists just them
with the window's name as a chip. The panel's search field narrows the same
way (see [Past anchorages on the rail](#past-anchorages-rail)).
Entering History opens the Past Anchorages panel and lands on your most
recent stay. Leaving it clears the halo and the rings; the Anchor Watch chart
never shows a past stay ringed beside the live anchor. The search and the
calendar window stay as you set them until you clear them.
> History replaces the Anchorage lens the Merconi tab carried until
2.4.4. Merconi is back to two lenses, Diving and Discover.
Radar
A live circular radar of your swing:
radius.
the probability honeycomb appears here too — green = less likely,
red = most likely. The hexagon button in the forecast scrubber hides
it on both screens.
The radar updates continuously with GPS. It is the screen most captains
leave on overnight — glance at it, see the boat inside the ring, sleep.
The radar fills the top two-thirds of the screen and never resizes. Below
it sits the classic Command Control panel — a draggable sheet you can
pull between three heights (peek, normal, full). Its ALARM page carries
the drop/lift and alarm controls; the GPS page shows the position
readout and the seabed composition at the anchor drop. The Anchor
action opens the classic full-screen Direct It view (distance slider, wind
and wave readouts, recent anchorages) — the same anchor-alarm flow as the
original SafeAnchor.Net app.
> Want the app to open straight onto this screen? Turn on Start with
SafeAnchor in Settings → Safe Anchor.
Feedback & Support
The menu button on the radar screen opens an action sheet with the
radar's quick links: Anchor (Direct It), Remote, Store,
Plans, Settings, and Feedback & Support. Choose Feedback &
Support (also reachable from the sidebar) — everything lives on one calm
screen, so you never lose your place:
to support@anchorqueen.com with your app and device details already
filled in. If your device has no mail set up, it hands off to your default
mail handler instead.
add a short title and your message, and optionally attach a
screenshot. If a screenshot can't be uploaded the app tells you and
keeps your text so you can retry or remove it — it is never silently
dropped.
badge (Open, In progress, Resolved, or Closed). Your most
recent thread is open by default, so the replies and the reply box are
right there — just type and send, no tapping to expand. Replies and status
changes appear live, and you get a notification (and a sidebar
badge) when the team answers.
You must be signed in to start a conversation so we can reply and keep
your history together; you can always email us instead. Sign in from your
Remote
Remote lives on its own top-level Remote tab — that page is the
overview. The sections below are the control-by-control reference for the
machinery the tab and the anchor watch share (beacon, channels, drift alerts,
fleet strip).
Automatic Live Beacon
Whenever your boat is on the water — anchored or under way — AnchorQueen
broadcasts a live beacon with your position so others nearby can see you in
real time. Automatic broadcasting is included with Real-Time Remote, Pro,
and Max; the Live Beacon card on the Remote screen shows whether it is
active. Free captains can still watch public beacons and join an invited
channel, but do not auto-publish.
Your privacy setting controls what is shared:
you live on their chart by turning on Public Beacons in their
Chart Layers (you appear with an amber ring).
details are hidden, and you do not appear on the public chart layer.
Change this any time in your captain profile. Anonymized
beacon data also helps AnchorQueen learn which anchorages get crowded.
When your anchor watch is armed, the beacon switches to auto-monitoring
automatically for Real-Time Remote, Pro, and Max. If you do not already
have an active channel, AnchorQueen gets or creates your stable private channel,
joins it, and starts sending the live boat fix. This works even near shore where
automatic on-water detection is unsure, and repeated anchor-state updates do not
create duplicates. The Remote screen shows "Anchor Watch — Broadcasting" while
this is active; share the ready invite code to let a specific person watch.
Channels — watch a boat or a fleet
The Channels section lets you share a private live track or run a fleet:
up to 2 people can watch. You get an invite code to share; tap the
share button to send it. Add an optional password to lock it.
together: Remote/Pro up to 10 vessels, Max up to 100. Everyone who
joins sees every boat on one map.
password if the channel has one) to start watching. Joining never requires a
subscription — only creating a channel does.
Once you're in a channel, the section lists every connected vessel with its
name, captain, and a live / stale indicator. The channel's current invite
code is shown there too — tap the code to copy it, or tap the rotate
button (⟳) to generate a fresh code, which immediately stops the old one from
working (handy if you over-shared it); people already in the channel stay
connected. Tap Leave Channel to stop. The Remote screen always uses the
dark chart palette, day or night.
Watching from a second device. To leave one device on the boat (say an
iPad) and follow it from another (your iPhone), sign the watching device into a
different account and join the boat's channel with the invite code — or, if
the boat is a Social Captain, just switch on
Chart Layers → Public Beacons on the watching device.
Two devices on the same account would clash (each hides the other as
"self"), so use a separate account for the watcher.
> Receiving public beacons and joining by invite remain free. Automatic
> broadcasting and automatic private-channel activation require Real-Time
Remote, Pro, or Max.
Your fleet also rides on the chart HUD. While a channel is live, the GPS HUD
in the top-left of the chart grows a REMOTE section — link state, a chip per
boat with its status ring and live distance, tap-to-fly, follow camera, and a
red DRAG strip that survives collapsing the card down to its RMT·n rail
chip. See Chart — your fleet on the HUD.
Push-ashore drift alerts
Watching a channel is not only passive. When a boat you are watching starts to
drag its anchor, AnchorQueen sends a push notification to the people on
shore — every watcher in that channel gets alerted the moment the boat
crosses its safe zone, not just whoever is aboard to hear the siren. That is the
point of Remote: the captain may be asleep below, but the partner ashore, or the
crew member ashore for dinner, finds out instantly and can call the boat.
dragging, not a stream of repeats while it sits past the line.
[fleet strip](#fleet-strip) and the chart at the same time, so a glance
confirms which vessel it is.
channel, or Flotilla for a fleet). A Free watcher can receive the
channel owner's alert, but a Free boat does not auto-create or auto-broadcast
a Remote channel.
On the chart — the fleet strip
While a channel is live, every connected boat also shows on your nautical chart,
and a row of round device buttons floats across the top of the chart — one
for each connected vessel or watcher:
status ring: teal = at anchor, indigo = under way, red = dragging, grey =
offline. A small corner badge marks ⚓ anchored boats apart from people who
are only watching (a phone or computer icon).
the quickest way to find a vessel that's off-screen.
Show who's connected. Tap your own boat (the ringed dot at your current
position) to draw dashed lines from you to every boat in the channel — a quick
picture of the whole fleet you're linked to. Tap it again to hide the lines.
The same fleet is reachable from the GPS HUD's
REMOTE section, which adds link state, distances from
your boat, a follow camera, and a per-vessel anchor-ring mirror.
Flotilla — track a whole fleet
A flotilla is a shared channel for a group sailing together — a rally,
charter fleet, club cruise, or regatta. Pro tracks up to 10 vessels, Max up
to 100.
Join by Code (free) — from the app or a link.
board gives you:
card: captain and home port, live status (under way / at anchor /
dragging), speed, course, heading, distance from you, battery, signal age,
vessel specs (type, length, builder, year), and exact position (tap to copy).
The card updates live as new positions arrive.
Organisers can also manage the fleet and build the day-by-day itinerary from
the web portal at anchorqueen.com → Flotillas. (Posting fleet updates to
social media is coming in a later release.)
Setting the right radius
A common starting point is your deployed rode length plus 15–20 m for GPS
drift. Tune after one full tide cycle.
Seabed Type & Community Substrate Reporting
Below the position read-out on the GPS tab, AnchorQueen integrates a live, offline-capable Seabed Readout Card that displays the bottom composition and anchor holding quality at your current position (or at the anchor drop coordinates once set).
On the chart, the anchor-mark placard mirrors this. Once you drop the hook, the floating info card beside the anchor symbol adds two lines: the seabed type and holding at the drop point, and a digital depth read-out. Both resolve in the same order as the readout card:
* Seabed: your own report for the spot first, then the charted SBDARE data, then nothing if the spot is uncharted.
* Depth: the measured depth you logged with your report first; otherwise live water depth from EMODnet Bathymetry (in your units). The line is omitted while offline or where the service has no value.
The card auto-positions itself on the side of the anchor away from your boat, so it never sits on top of the anchor symbol, the tether, or the vessel — it slides to the opposite side as the boat swings, keeping the busy area around the drop point readable. The lookups run off-screen and only refresh when the anchor moves — or the moment you file a report — so the chart never stutters.
If the placard shows no seabed, or the charted type is wrong: flip the bottom command panel to its GPS page (tap the GPS indicator at the top of that panel — it auto-shows the ALARM page while the watch is armed), tap the Seabed Readout Card beneath the position read-out, and set the type / holding (and optionally the measured depth) in the picker. Your report overrides the chart everywhere it's shown, including this placard — it updates as soon as you submit, without re-dropping the anchor.
Off-Main-Thread Spatial Queries
To prevent UI thread layout thrashing and frame drops during map panning, the substrate engine runs entirely in a background isolate:
* Isolate Parsing: The Seabed Query Service performs background-isolate-driven parsing of hazards.geojson (loading S-57 SBDARE seabed area polygons and precomputing bounding boxes) off the main thread.
* Ray-Casting Lookup: Point-in-polygon queries are computed asynchronously via ray-casting.
* Quantized Debouncing: Viewport coordinate lookups are quantized to a ~100 m grid and debounced by 150 ms to avoid query storms during panning.
Reading the Composition & Holding Quality
The readout card shows a waves icon, the official IHO S-57 abbreviation, the plain-language name, and a color-coded Holding Quality Chip:
* 🟢 Good Holding: Sand (S), Mud (M), Clay (Cy), Silt (Si). Perfect for standard anchors (Delta, Rocna).
* 🟡 Fair Holding: Gravel (G), Pebbles (P), Cobbles (Cb). Requires extra scope due to poor penetration.
* 🟠 Poor Holding: Stone (St), Rock (R), Boulder (Bl). High risk of sliding or snagging.
* 🔴 Do Not Anchor: Coral (Co), Weed (Wd), Shells (Sh), Unknown (Unk). Severe dragging risk or ecologically protected zones.
Submitting a Community Observation
If you anchor in an uncharted spot, or if your anchor brings up a substrate that differs from the chart (e.g., weed instead of sand), you can submit a community report:
Caching & Cloud Synchronization
Your observation is managed by the Seabed Report Manager:
* Local Caching: Saved instantly to your local device database so it shows next time you visit the coordinates (matching radius of 120 m).
* Firestore Sync: If online, the report is securely uploaded to the global community database via a Firebase HTTPS Callable Function (submitSeabedReport).
* Offline Support: Reports created while offline are queued locally and synchronized automatically once your cell signal returns and you are signed in.
Try the watch without leaving the dock
To rehearse the anchor watch — arm it, then watch it alarm as the boat
"drags" — turn on Simulator Mode in
Settings → Nav. It feeds the anchor watch a
position you control, so you can drop the anchor, then nudge the throttle
and helm on the chart console to drift the boat past the radius and hear
the alarm fire. Turn Simulator Mode off to return to real GPS.
The console collapses in stages — full helm → autopilot strip → a slim
command rail — and the slim rail now has its own minimize (chevron)
button that tucks it away to just the corner S badge, fully clearing
the chart. Tap the S to bring the controls back.
Instrument data source
By default the anchor watch uses your device's built-in GPS. If your boat has
an NMEA Wi-Fi gateway or a Bluetooth instrument pod, you can drive the watch
from it instead — a masthead GPS is steadier than a phone below decks. Choose
the source in the Settings → NMEA sub-tab
Built-in GPS, NMEA over TCP/UDP (enter the gateway host and
port — 10110 is standard), NMEA over Bluetooth (scan and pick your pod), or
Signal K (connect to an on-board Signal K server — see below).
The same screen shows live diagnostics so you can confirm position, depth, and
wind are arriving before you rely on them.
While an instrument source is feeding the watch, a small Instruments badge
appears at the top of the radar screen:
re-establishing the link.
If the feed goes silent for 30 seconds the watch automatically falls back to
your device's GPS so you are never left unguarded, and a red banner tells you
it has switched. The badge disappears once the watch is back on phone GPS. Your
configured source is remembered and reconnects automatically the next time the
app launches.
Signal K
[Signal K](https://signalk.org) is a free, open marine-data standard. If you run
a Signal K server on board — on a Raspberry Pi, a chartplotter, or an onboard
computer — AnchorQueen can connect to it over Wi-Fi and read live depth, wind,
heading, speed and your boat's GPS from a single link, plus AIS traffic in the
same stream.
To connect, pick Signal K as the source and tap Scan for Servers —
Signal K servers announce themselves on the boat's Wi-Fi, so yours should
appear by name within a few seconds; tap it and the address fills in by
itself. (You can always type the host and port — 3000 is standard —
by hand instead.) Then tap Apply & Connect. No boat network yet? Tap
Try Test Server — it points the app at the public Signal K demo server
and connects straight away, so within a second or two the Activity Log,
the Feed Status and the live readouts all start moving. The demo streams real
sample data from a recorded voyage, so you can confirm the whole chain works
before wiring your own boat. Below the address are three optional settings:
connection. Traffic your own boat receives is drawn alongside the internet
AIS feed, and takes precedence over it when both report the same ship.
connections. Leave it off for a server on your own boat network.
Signal K version 2 servers do by default; create a token on the server under
Security → Access Requests and paste it here. Without it the server accepts
the connection and then refuses the data stream.
The screen then shows a live Feed Status and an Activity Log of every
connection event — connecting, link established, first fix, any drop — so you
can confirm real data is flowing before you trust the watch. When a fix arrives
its accuracy is read from the server (from the GPS HDOP value), and the drag
alarm widens its margin automatically on a weak fix.
Once connected, the chart's GPS HUD shows the link state,
depth, wind, heading, speed, and temperature values the server is actually
publishing. A fresh Signal K self position also adds the named, directional
boat to both the HUD and chart; tap its HUD row to fly to it. LIVE SK means
the feed is live—it does not mean a Voyage is recording.
To make that boat fix drive the chart, Navigation, Voyage recording, and this
anchor watch, switch on Signal K Position under Settings → NMEA → Signal
K Stream, then tap Apply & Connect. Leave it off when you want the phone
and boat positions displayed separately. If the server fix becomes stale for
30 seconds, AnchorQueen falls back to device GPS so the watch remains guarded.
Depth readings are labelled with what they are measured from, because the
difference matters:
If your server publishes the sounder offsets, the app converts to below-keel
automatically and shows BK. If it does not, the reading keeps its own label
rather than pretending to be clearance you do not have — a 2.5 m BS reading on
a boat drawing 2 m is half a metre of water, not two and a half.
New to Signal K? The Set up a Signal K server link on that screen opens the
official install guide, and About Signal K opens
[signalk.org](https://signalk.org).
Technical Details: Relocation & Filtering
Direct-It anchor placement
When you drop your physical anchor, the boat usually drifts back under wind
or current before it settles. Dropping the pin at the boat's *GPS position
after settling puts it astern of where the hook actually lies. *Direct
It projects the pin forward to the real anchor position.
It is a distance-only control — you never type a bearing:
Drag it to set how far ahead of the vessel to place the anchor (the
readout shows the distance in your units). A live preview shows where
the pin will land as you drag.
the anchor while a watch is already active asks you to confirm.
> How it works. Direct It projects the pin along your live device
> heading — read automatically from the compass (true heading preferred,
> magnetic as fallback) — at the distance you set on the slider. You point
> the bow at the hook and the heading is taken for you; there is no bearing
> to enter. Over the short scope distances involved, a flat-earth offset
from the vessel's fix is accurate to within a few metres.
GPS Filtering & SMA(9) Smoothing
GPS receivers on mobile devices are prone to multipath reflections and horizontal dilution of precision (HDOP) spikes, especially in narrow coves or next to cliffs. This can cause "GPS jumps" that trigger false alarms.
In Settings → Advanced, you can choose between:
$$\overline{X} = \frac{1}{9} \sum{i=1}^{9} Xi, \quad \overline{Y} = \frac{1}{9} \sum{i=1}^{9} Yi$$
This suppresses single-frame spikes of up to 25 meters, preventing middle-of-the-night false alarms while maintaining an active response time of under 30 seconds for actual boat dragging.
If something goes wrong
Troubleshooting: false alarms.
Test Alarm Sound in [Settings → Safe
Anchor](settings.html#anchor-watch) to check the sound; see