
 Anchor Alarm
Capt's Notebook
The Capt's Notebook tab is the same nautical chart as
SeaTracker, but framed around the marks you have saved.
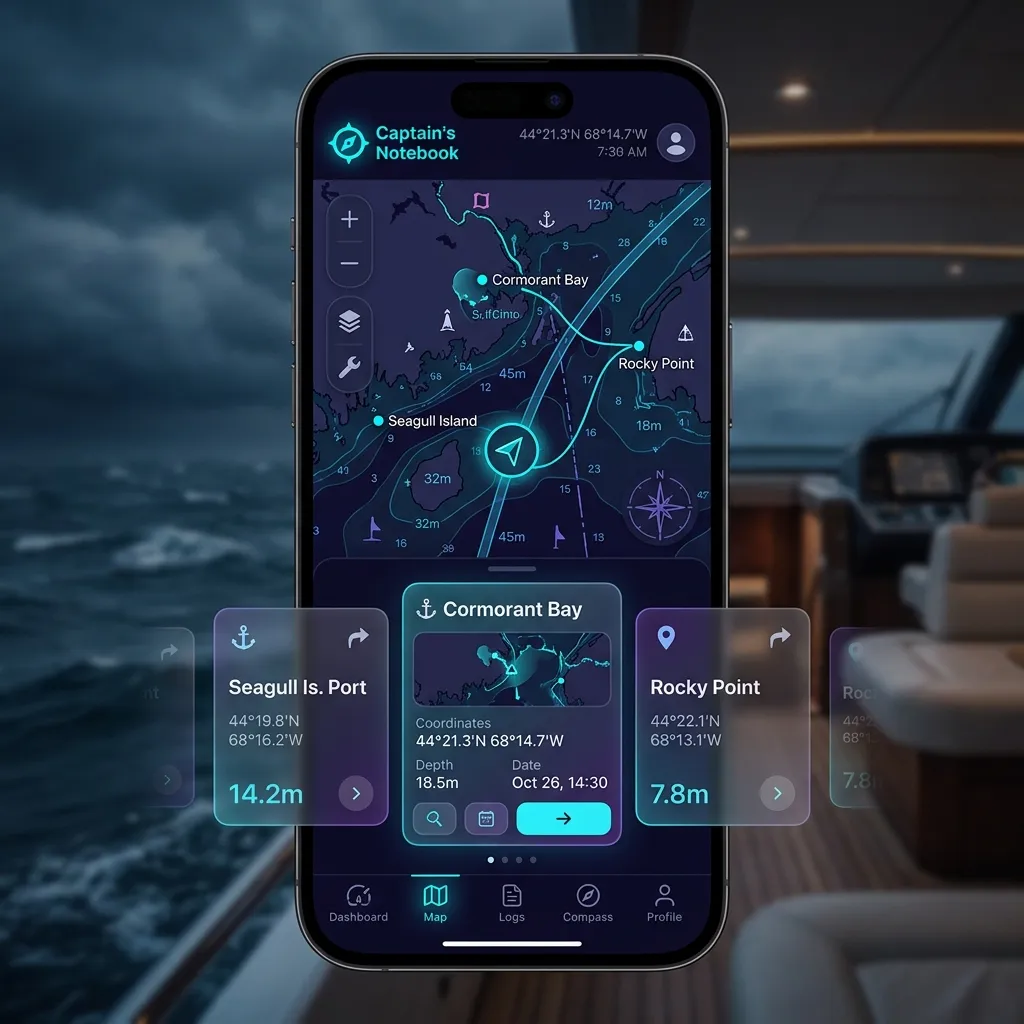
What changes from SeaTracker
never changes your chart style, so the map is instantly ready with no
reload. (Earlier versions swapped to a dedicated Notebook style on entry;
that automatic switch has been retired.)
chips, one per captain's mark you have saved. One library capsule at the
leading edge shows your total pins and opens the carousel's menu —
Manage pins, Show all marks, and, once your pins span more than one
cruising area, a Region list to narrow the row to a single area.
colour on the chart, its name, and the live distance from the chart
centre. Tap one to fly the chart there. The chip nearest the chart centre
carries a cyan ring — that is the mark you are looking at.
are looking floats to the front. (The reorder is normal; the carousel is not
broken.) The row fades out at its right edge whenever there is more to
scroll to.
that region's name and count. Tap the chip to clear the filter and get the
whole row back.
Marks legend so nothing is hidden.
map, same zoom, same position.
All the chart power is still there — Route and
Voyage sub-modes, every legend layer, the
MOB button, tile caching, and track recording.
Adding marks
There are two ways to start a mark:
want to save. The captain's mark appears immediately in the Pin Carousel.
the round photo-plus button on the right-hand control rail, just under
Jules. The New Photo Mark sheet opens. Pick up to four pictures from your
library; they become a new mark in one step. The mark is placed automatically
where the first photo was taken (from the photo's location data) — or, if
no picked photo carries a location, at your current position, and only if
that is unknown too, at the centre of the chart. The sheet always shows
which of the three it used. Give it a name, sign it if you like, then tap
Add to Notebook. The chart flies to the new mark and opens it so you can
add more.
A mark that has a photo shows on the chart as a round photo pin — a small
circular crop of its cover photo — with its title and date printed just
beneath it, so you can recognise a place at a glance without opening it.
Photos
Open any mark and scroll to Photos to attach pictures from your library.
Each photo is resized and saved on the spot. (You can also start a brand-new
mark straight from photos with Add Photo — see [Adding marks](#adding).)
zoom; swipe left/right to move between the mark's photos.
image at the very top of the mark. Pull the mark sheet down and the cover
stretches. Long-press any photo and choose Set as Cover to change it
(marked with a ★).
appears on its thumbnail. In the full-screen view its place name and
coordinates are shown, with a Show on map button that jumps the chart to
where the photo was taken.
existing mark and the photo was taken a little away from the mark (between
about 50 m and 50 km), a yellow banner offers to Move the pin to the
photo's location. Tap Move to relocate the mark, or ✕ to keep it where it
is. Photos shot right on top of the mark, or implausibly far from it, do not
trigger the offer.
Voice memos
Open any mark and scroll to Voice Memos to record spoken notes — handy when
your hands are busy at the helm and typing isn't.
red button to start, and again to stop. Each memo can run up to 45 s — a
running 0:00 / 0:45 counter shows how much is left, and recording stops on
its own at the cap. Tap Done to keep it or Cancel to discard.
audible even with the ringer switch set to silent, so you can review a note
on a quiet deck without unmuting the phone.
Memos are saved on the mark right away and stay put across app restarts, the
same as photos.
Sign your marks
A captain's mark can carry your signature — the digital equivalent of
signing a line in the ship's log. Open a mark, scroll to Captain's Signature,
and tap Sign this mark. The mark is stamped with:
Once signed, the mark shows a seal with those details. You can Re-sign (which
updates the time) or Remove the signature at any time. When you create a mark
from photos with Add Photo, the Sign as Captain switch lets you sign it on
the spot.
Signing needs you to be signed in — the signature uses your captain profile. If
you are signed out, the Sign In button takes you to the
Captain tab.
Manage and delete pins
Tap the library capsule at the leading edge of the Pin Carousel and choose
Manage pins to open the Pin Manager — a list of every mark you have
saved, newest first.
mark. Each row shows its name, place, distance from the chart centre, and the
date you saved it.
remove, then tap Delete in the bar at the bottom and confirm. Use Clear
to drop the selection. Deleting a pin can't be undone.
This is the place to clear out old marks — there is no delete control on the
carousel pills themselves.
Anchorage marks in 3D
A mark of the Anchorage type is a stay you want to remember. Its editor
carries Anchorage in 3D: the stay recorded within 60 m of the mark opens
over 3D terrain — the anchor, the rings you had set, the swing scrubbed
from the lift back to the drop, and the weather recorded while you lay there
(see SafeAnchor → Past anchorages in 3D).
A mark with no recorded stay behind it opens on the anchor with default
rings. The button needs the 3D feature switched on and a connection, like
the 3D Terrain Flyover beside it. On the Free plan the Flyover button
gives you one full fly-over per app session, then opens the Pro sheet — the
Pro card lower in the editor shows a clip of the fly-over and carries the
same Try it once, free button.
The ship's logbook
The Notebook now has two faces, switched with the small bar at the top of the
chart: Marks (the pin collection described above) and Logbook — a real
ship's log built the way professional logbooks work, following the
international SOLAS V/28 record-keeping rules.
Keeping a log, start to finish
If you only read one part of this page, read this. A typical passage, in
order:
bar at the top of the chart, then tap the pre-departure check chip.
Work down the list (crew, provisions, draught, fuel, water, steering, nav
gear, comms, bilge, weather briefing), add the numbers you know, and save.
That is your §3.1 pre-voyage record, filed in one go.
would (the record button in the chart tools). The log writes your
departure line the moment recording begins, and from then on fills
itself: hourly position fixes, big course changes, engine and sail
changes, anchor set and aweigh.
cannot know: a ship passed close, a sail change you want the reason for,
a fault, a decision to divert. Pick the kind, type the line. Your
position, the conditions and your signature are already attached — drop
any of them with a tap if you would rather not record it.
call heard, man overboard. Use the Events group in the composer.
These are the entries an inspector or an insurer reads first, so give
them the detail you would want a year from now.
any anchor alarm is recorded. While a voyage is under way or the anchor
watch is armed, once a day the app also files the conditions you are
lying in, so a quiet night is still a page in the log — but a day spent
ashore writes nothing.
files itself into the log.
correction, or Strike out to rule it through with a reason. Nothing
is ever deleted — that is the point.
you. Add a port remark for anything worth noting about the berth or the
clearance-in.
Ship's Logbook) exports the page-numbered PDF to keep, print, share, or
hand over.
> Two things worth knowing before you rely on it. Nothing you write can
> be deleted, only corrected — so write freely, and fix mistakes with an
> amendment rather than hesitating. And the log is yours: it is stored on
> the boat's device first and synced to your captain account, not published
anywhere.
What you see
The log opens as a floating window over the chart — not a panel welded to
the bottom of the screen. Put it where it suits the passage you are looking
at, make it the size you want, and close it when you are done:
you leave it — there are no preset positions or heights to fight, and the
window is remembered between sessions. It can never be dragged fully
off-screen or up under the top bar.
one keeps the opposite corner pinned, so a window parked against the right
edge of the chart can be widened leftwards without moving it first. A short
window shows the day's summary and the + Entry button; make it taller
and the full entry list appears. Portrait and landscape remember their own
size.
opened it is also the way back.
reading desk. It keeps the ship's day you were already reading; close it and
the floating window is still on that day.
days with a gentle tick. Each day's bar height shows how much happened. A
drag straight up or down across the slider moves the whole window instead,
so you never have to hunt for the header.
UTC beneath), what happened, and position/weather chips when they were
captured. Entries with a position also appear on the chart; tap one to fly
there.
followed by Jules' report, the official entry lines, and every recorded
passage connected to that ship's day. Tap Replay beside a passage to
return to the chart with it loaded and paused. If more than one passage was
recorded that day, choose the one you want; overnight passages appear on
both days they cross.
review, or open Filter Journal to combine text search with author,
category, event type and voyage filters. These controls only change what is
visible; corrected and struck lines remain in the append-only ledger.
evidence panel to check its frozen position, weather, alarm or confirmed
route-change evidence. Replay from entry starts a matched recorded
passage at the nearest real fix. If there is no immutable photo attachment
link, the Journal says no photo evidence is linked rather than guessing from
the photo library or Captain's Marks.
They are a reading aid on this device, never a logbook amendment and never
part of PDF/CSV exports. The Journal's Export menu shares only the ship's
day currently open, while the floating log's ⋯ menu still exports the full
record.
exports the log as PDF, CSV, or GPX — see
[Import and export](#logbook-export).
Entries write themselves — and you can add your own
While a voyage recording is running, the log fills automatically: departure
and arrival, hourly position fixes, big course changes, sail/engine changes,
anchor set and aweigh, anchor alarms, and MOB events. Auto entries carry a
small AUTO badge; entries brought in from a GPX track carry IMPORT,
so an inspector can always tell an instrument reading from a human
observation — and both from a record made by another device.
Tap + Entry to write your own line: pick what kind of entry it is
(grouped as Pre-voyage · Underway · Events · In port), write your note, and
keep or remove the position, weather, and signature chips that are pre-filled
for you.
Before setting out, use the pre-departure check — crew aboard, fuel,
water, steering, nav gear and the rest — which lands in the log as a single
checklist entry, the way a proper pre-sailing record should.
The daily weather record
Once a day, wherever you are, the log records the conditions you are lying
in — at anchor, alongside, or under way. The record is written the first time
that day the app has both a position and a weather report, so a night at
anchor is never a blank page in the log. It carries an AUTO badge like
the other automatic entries.
The app checks the log itself, not a stopwatch, before writing: if
today's page already has a weather record, nothing is added. That means
restarting the app, crossing into a new time zone, or having the entry
already arrive from your other device all leave you with exactly one record
for the day — and the day counted is the ship's day, at your own local
time. If you strike a weather record out, the day is owed a new one and the
app writes a fresh one.
Turn it off in Settings → Data → Ship's Logbook → Daily weather
observation. It is on by default.
Filing a report into the log
Any report you are reading can go into the log as your own entry, written up
for you — you never retype what is already on the screen. Look for Add to
Logbook:
The entry is filed at the pin, not at the boat: a forecast for an
anchorage forty miles up the coast is a note about there, and the log
says so. The conditions saved on the pin are frozen into the entry, so it
still reads correctly a year later.
is showing, for your position or for the pinned location you are viewing.
The daily voyage report is the exception: it has no filing button because
it files itself (see [The daily voyage report](#daily-report) below).
Filed entries are marked as yours, not as automatic, because you chose to
put them on record. Each one is stamped with your position, the conditions,
and your captain's signature, exactly like a hand-written entry — and, being
log entries, they can be amended or struck out but never deleted.
Corrections, the logbook way
A ship's log is never erased — and neither is this one:
stays visible, struck through, marked "superseded".
forever.
The daily voyage report
Around local noon, Jules writes your daily voyage report from the log —
position, distance run, course and speed made good, conditions, anything
notable — and it arrives as a notification even when the app is closed.
Tap it to read and share the report. Offline at sea you still get the
figures from the on-board log; Jules' narrative catches up when you're back
online.
Reports follow the ship, not the phone. A report is written only when
the log shows the ship was actually in operation — real distance covered, an
entry in your own hand, or an open voyage (a quiet day at anchor mid-cruise
still gets its position report). Days ashore stay silent. In Settings →
Data → Ship's Logbook you can change this: During voyages (the
default), Every day if you want a noon report regardless, or Off for
none at all — and the Report notification switch files the report into
the log silently, without announcing itself.
The report matches the day. A day that made way gets the full noon
report — distance run, course and speed made good, engine hours, how the
wind built or eased, anchor work, notable events. A day swinging at anchor
gets a short conditions note instead: a quiet day is allowed to read quiet,
not padded into a story.
Every report stays readable — the Ship's Journal. In the Jules tab's
+ menu → Ship's Journal the Journal opens full screen, straight from the
log on this device — no connection needed, and no limit on how far back you
can read. Pick a ship's day to see the full narrative and frozen figures beside
that day's official entries and recorded passages. A passage with at least two
recorded fixes has Replay, which returns you to the chart with playback
loaded and paused.
For an inspection or debrief, narrow the official lines by author, category,
event type, voyage or search text, then tap a line to inspect its linked
position, weather, alarm and route-change evidence. A fixed line inside a
matched recording offers Replay from entry at the nearest recorded fix.
Local bookmarks help you return to notable lines without changing or exporting
the official record, and the Journal's export menu shares the selected ship's
day as PDF or CSV.
The report becomes part of the log by itself. You do not have to file it:
the next time the app syncs, the day's report is written into your logbook as
its own entry, so it shows up in the timeline, marks that day as reported,
and — the part that matters — appears in your PDF export. A daily report
that only lived in a notification would be missing from the record you hand
to anyone.
Each day gets exactly one report entry, whichever device sees it first. The
day counted is the ship's day at the position the report was cut, so a
report made in one time zone still lands on the right page after you have
sailed into the next one.
Import and export
The ⋯ menu in the log window's header does both, right where you keep the
log:
chartplotter, a watch, a tracking app — into the log as position-fix
entries on the days it was actually sailed, filed under its own closed
voyage so the passage reads as one piece with proper line numbers. The
track is thinned to your underway-fix cadence (so a point-per-second
recording doesn't flood the pages), speed and course are worked out for
each leg, and points already in the log are skipped, so importing the same
file twice adds nothing. Times are shown in the ship's time for where
the track was sailed (the traditional 15°-band nautical zones), not
where you happen to be standing during the import. Each import starts
with a line naming the track and the file it came from, and every
imported entry carries the IMPORT badge. A GPX with no timestamps
can't become history — import that one as a route instead (Chart → Route).
(voided lines printed struck-through, exactly as recorded), CSV for a
spreadsheet, or a GPX track of every position the log holds — one
track segment per voyage, ready for any chartplotter (and re-importable
into another AnchorQueen, where the duplicate check makes it land
cleanly). Each opens the share sheet — save to Files, print, AirDrop, or
send it straight through WhatsApp, Mail, or any messaging app on your
phone.
The same export lives in Settings → Data → Ship's Logbook, which also
sets how often automatic position fixes are logged (30 min / 1 h / 2 h) and
whether the daily weather observation is kept.
Photo evidence
When you write an entry you can attach up to four photos as evidence —
the damage, the fouled anchor, the customs stamp, the sea state you are
describing in the line. Tap Choose photos in the entry sheet; the
thumbnails appear there before you save, and the ✕ on a thumbnail drops it
from the draft.
What happens on Save is what makes these different from the photos on a
notebook mark:
re-compressed, not resized.
Journal will only show the picture if the stored bytes still match the
fingerprint the line recorded.
delete, no replace, and no "swap the photo" — remove it before you save or
it stays. A correction is filed the same way any other correction is: a
new line ([Corrections](#logbook-corrections)).
Attached photos appear under Related evidence when you tap the line in
the Ship's Journal. Tap a thumbnail to see it full size.
Photos stay on the device that took them. They are never uploaded, so
they are not on your other phone or tablet even though the entry itself
syncs. A line whose photo isn't on the device you are holding shows the
thumbnail with a warning badge instead of the picture.
The inspection packet
⋯ → Export Inspection Packet (.zip) seals one ship's day into a single
file for a surveyor, an insurer, a port state inspector or a charter
dispute.
Inside the ZIP: the day's PDF, the same day as CSV, every photo the day's
entries reference, and a manifest.json listing each ledger line with its
own fingerprint. A signature.json signs that manifest with a key held in
this device's keychain, so anyone can check afterwards that not one
character of the log and not one pixel of a photo changed after the packet
was made.
Two things worth understanding before you hand one over:
is not a notarisation, not a qualified electronic signature, and it does
not prove who you are.
If the day's evidence isn't on the phone in your hand, the export stops
and says so rather than quietly producing a packet with photos missing.
A season of entries takes a moment to typeset, so the Export button turns
into a progress ring that names what it is doing — Reading the log,
Rendering pages, Writing file — and fills as the pages are laid out.
The app stays responsive throughout: the rendering happens in the
background, so you can keep scrolling the log while it runs. When it
finishes, the share sheet opens with the finished file.
Your log syncs to your captain account when signed in, so it survives a lost
phone and follows you to a new one.
Using your notebook on passage
The Notebook is the right tab when you are:
If something goes wrong
Pin Carousel.
always sorted nearest-first to the chart centre, so the order changes as you
move the map.
pills. Tap the library capsule and choose Manage pins to open the
[Pin Manager](#manage) and delete from there.
slot in the row while a region is actually selected; otherwise it lives in
the library capsule's menu under Region.
wrong, pick a different one in Chart Layers → Maps;
your choice applies everywhere.
app restarts — drop a pin, add a photo, and it will still be there next
time you open the app.