
 Anchor Alarm
Basic UI — the chrome around every screen
A few controls float above every tab. Learn them once and they work
everywhere.
The tab bar
Ten tabs let you switch surfaces:
the leading edge.
Each tab is identified by an icon — anchor for SafeAnchor, antenna
(📡) for Remote, dolphin for Merconi, pixel octopus for Jules,
gear for Settings, and so on. Tap any tab to switch.
A sidebar toggle (the sidebar.left icon) at the top opens or hides a
menu listing all tabs with their full names — useful before you have
memorized the icons. A search affordance opens the
[Command Palette](#command-palette). On iPhone portrait the search button
sits inline in the top tab bar, immediately before the SeaTracker pill —
so reaching for search and the chart is one gesture. In landscape it's a
magnifier at the top of the side strip.
A small badge on the Store tab shows how many of your installed
regions have updates waiting.
Inside Store, For you helps you choose coverage, with Charts, Plans
and Jules directly accessible. A chart-region link from the map opens
Charts directly, preserving the region you selected.
Where the app opens
The very first time you open AnchorQueen you land on the AnchorQueen
chart tab. After that the app remembers where you were: close it on Meteo,
Jules, or the Store and it opens there next time — including the sub-mode
you left the chart on (Route / Discover / Voyage) and the screen you left
SafeAnchor on (Anchor Watch / History / Radar).
Two things override the remembered tab:
the app, it always reopens on SafeAnchor — that surface outranks
everything else.
Launch, see #navigation), every launch goes to
the SafeAnchor Radar screen instead.
After an update: what's new
The first launch after AnchorQueen updates opens that version's release
notes on top of whatever tab you were on. It happens once per update — close
it and it stays closed until the next one.
missed yet.
your anchor and the notes wait for a launch when the watch is off.
Settings → Help, where the notes for earlier versions
live too.
Menu in the side panel (iPad landscape)
On iPad in landscape the map opens a resizable side panel on the
right edge. There the menu lives inside that panel as its home screen —
the separate left drawer and its toggle are not shown, because the panel
already gives the menu a permanent place with far more room. Tapping a
feature on the chart (a harbour, a vessel, a legend) slides its detail in over
the menu; Back returns you to the menu. Collapse the panel with the
chevron to reclaim the full map; the thin rail that remains re-opens it.
On iPhone the menu works the same way in every orientation: the left
drawer opened by the sidebar.left toggle described above. In landscape the
toggle sits at the top of the left tab rail, so rotating the phone never
moves the menu to the other side of the screen. The right side panel still
appears on iPhone in landscape — but only to host feature details, the route
planner, and the simulator console (below), never the menu.
On iPad held in portrait there is no side panel either, so the menu stays
in the left drawer there too.
Route planning & Simulator dock here too
In landscape, panels that would otherwise cover the bottom of the chart
move into this same right side panel, so the map stays clear:
the depth / wind / wave / speed graphs, and the route actions) fills the
side panel instead of a bottom sheet. The menu is hidden while you plan and
returns when you leave Route mode or minimise the panel.
the simulator is running.
In portrait both still appear as draggable bottom sheets over the chart.
The sidebar header
The top of the sidebar carries a few quick links above the tab list:
captain profile. While you are signed out the card reads
Sign In, and tapping it opens the
sign-in screen — the same one the Captain tab
shows — so you can create an account without leaving the chart.
jumps to the Store subscriptions.
AnchorQueen, so it works with no signal at all; it includes the release
notes for this version and for earlier ones. See
to you (and the subtitle reflects open conversations), tapping straight
into the thread. Opens the in-app feedback flow where you can
report a bug or request a feature, attach a screenshot, and track the
status of everything you've submitted (Open / In progress / Resolved /
Closed) — with the team's replies and your own follow-ups in one thread.
The same screen is reachable from the SafeAnchor → Radar menu — see
Live Discover — what you've collected
On the map tabs the sidebar opens with a LIVE DISCOVER section. As you
pan the chart, AnchorQueen pulls nautical objects from online services —
lights, buoys, beacons, harbours & marinas, anchorages, dangers, landmarks,
and wrecks — and keeps them as you go.
Each row shows two numbers, e.g. Lights · 400 · +45:
(since the app launched; objects already cached from a previous run are
not counted).
A +N chip next to the pulsing LIVE DISCOVER header sums the session
total across every category — your "collected so far" tally.
Tap a row's +N badge to open the list of just those newly-collected
objects, sorted by distance. Tap any entry to see its full detail or swipe
to save it as a waypoint. (The AIS Vessels row shows a live count only —
vessels come and go, so there is no session tally.)
Reordering the tabs
You can put the tabs in any order you like:
its new position.
Tap Reset in the top-right corner at any time to restore the original
order. Your arrangement is saved automatically and survives closing the app.
The top header (map tabs)
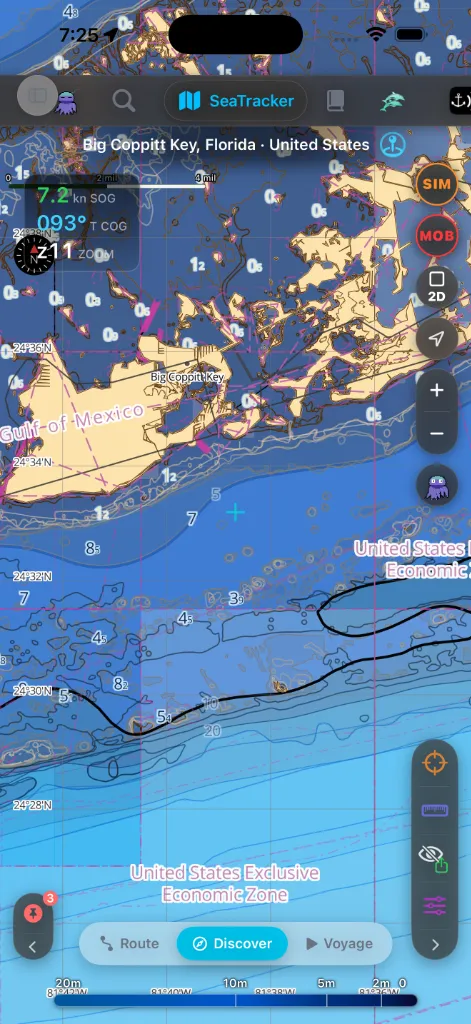
On the three map tabs (SeaTracker, Capt's Notebook, Merconi) a
slim header rides over the chart with the tab's name, breadcrumb of your
current location, and quick actions for chart style and layers.
The chart command rail
On any map tab every chart command lives on one glass plate anchored to a
vertical edge — the command rail. It owns the trailing edge by
default; the [content rail](#legends) owns the leading one. Nothing floats
loose over the chart any more, which is what gives the chart back its full
height in landscape — and puts the controls exactly where your thumbs already
are when you hold the phone sideways.
At the head of the plate sits the grip (⋮⋮). Below it the cells are
grouped by how badly you need them, with a hairline rule between groups.
Critical — never hidden, never moved.
(route picker → start) or, while a route is being followed, stop it.
Tapping STOP asks you to confirm first so a stray helm tap can't drop
guidance. While a voyage is actually running, STOP stays on screen in
every sub-mode — you can always end guidance no matter where you've
navigated to.
burns solid red while a passage is being recorded.
These hold fixed slots. Changing sub-mode, starting a route, or rotating
the device never shuffles them out from under your thumb.
Camera — never hidden either.
locked on your boat.
Contextual — whatever the current job needs.
zoom.
DEPTH to that point.
the chart and can be tapped to edit, share or delete them — see
Tools.
looking. Opens a small panel suggesting the chart region that covers the
current view, the one covering your GPS position when that differs, the
free worldwide base map while nothing is installed yet — plus an expired
("renew") or "update available" notice when an installed covering chart
needs attention. The cell lights up in accent colour while something is
waiting for you and calms once you have opened the panel; every entry leads
to the Store. See
Chart downloads for this area.
without leaving the map. The chat opens as a sheet anchored to the
bottom of the screen; drag the handle to resize it smoothly, drag it
down (or tap ✕) to close. To give the conversation maximum room the
sheet skips the Jules header and suggestion chips — both stay on the
predictor and heading ruler, for an uncluttered view of the chart under
your boat.
Cells appear only where they apply (Add Photo in Capt's Notebook; REC, MOB
and NAV in Voyage; the ADD / UNDO / DEL trio while you place waypoints), so
the rail never shows controls you can't use.
••• — the pocket. The rail measures itself against the screen it is on.
Anything that doesn't fit is pocketed behind the ••• cell at the foot,
which opens a two-column grid of the leftovers — beside the rail in
landscape, as a sheet in portrait. Critical and camera cells are never
pocketed and the rail never scrolls: on a short landscape screen it is the
tools that move into the pocket, never zoom or STOP. In landscape the cells
also draw slightly smaller, so more of them stay out on the plate.
Move the rails with the grip.
centre, or bottom of its edge — for when your hand sits low on the
case.
in one motion, so the commands land under whichever hand is free at the
helm.
back to their default sides and alignment) and Swap sides.
Both choices are remembered, and there is no audio-mute control on the chart.
> The collapse chevron and the dock swap are gone. The rail now sizes
> itself, so there is nothing to collapse, and the two rails trade edges
> as a pair instead of trading top/bottom slots on one edge. Any arrangement
> you set in an earlier version is carried over the first time you open the
chart.
The MOB button
The MOB button is the most important control on the chart — a black-glass
circle with a red outline and a red MOB label, sitting mid-cluster so
it's always in the same thumb-reach band as zoom and recenter. One tap:
Use it the instant a person or object goes over the side. It lives in the
Voyage sub-mode — the mode you are in while under way, which is when an
overboard emergency happens. The button greys out while a Man Overboard
incident is already active, so you can't fire a second one by accident.
The full return flow — the MOB return HUD, the hypothermia banner, and the
Real Drill / Cancelled outcomes — is documented in
The GPS HUD
The dark-glass control at the top-left of the chart is the captain's
watchkeeper rail. It starts on one line, stays out of the chart's way, and
opens only when you ask for more.
Tap anywhere on it to cycle:
| State | What you see | Best use |
|---|---|---|
| Minimized | Place, SOG, COG, zoom, LIVE SK, REC when recording, and the anchor chip while a watch is armed | Normal watch |
| Compact | Location header, passage state, core motion, and live instrument summary | Quick instrument check |
| Expanded | Position, target, range, depth, vessel identity, and trend graphs | Diagnosis and planning |
The next tap after Expanded returns to Minimized.
Read the rail
anchored through drifting, cruising, and fast. A sustained slow creep turns
amber before the dedicated drag alarm has enough movement to fire.
z).not start a Voyage.
The anchor zone, wherever the chart is
While an anchor watch is armed, the HUD carries it — on every chart tab, not
just SafeAnchor.
/ m you are from the drop point over the radius the alarm fires on. Green while
you are safe, amber approaching the limit, red while dragging.
(ANCHORED / WARNING / DRAGGING!), the same two figures, and a bar
showing how much room is left. The hairline tick on that bar is the alarm
boundary, so you can see the margin beyond it rather than a bar that pins
full the moment you reach the radius.
Tap either one to open the alarm-distance slider on the leading edge of the
chart and re-tune the radius on the spot — the same slider the Alarm On ·
The chip appears only while a watch is armed, and takes its width from the
place name, so an under-way HUD reads exactly as it did before.
Passage state announces itself, then steps aside
The coloured pill naming your passage state — On Land, Anchored,
Sailing, Motoring, At Sea — is news at the moment it changes and
not much use pinned to a one-line rail for the six hours afterwards.
So on the minimized rail it appears for five seconds whenever the state
changes, then fades and hands its width back to the place name. That is why
a long anchorage name reads in full on watch but shortens briefly after you
weigh anchor. Collapsing the HUD from an open state also re-announces it.
The state is never hidden from you: open the HUD and the pill is always
there, next to the place name, for as long as the card is open.
> LIVE SK and REC are independent. Seeing LIVE SK without REC is
normal: instruments are live, but no Voyage is recording.
Expand for position and target
The expanded HUD adds a GPS coordinate chip for the selected live position,
a Target chip for the map crosshair, and BRG / DIST / DEPTH from the
live position to that target.
Long-press either coordinate chip to copy it — the menu offers the marine
formats (DD / DDM / DMS), a geo: URI, an Apple Maps URL, an AnchorQueen
link, and Share…. If you paste a coordinate, a pill appears above the card
with Fly to and Add WP actions.
Identify the Signal K boat
Connection state alone is not a position. The vessel appears only after the
server publishes a fresh, valid self position.
When it does, the HUD and chart use the same top-down hull symbol as Navigation
and SafeAnchor. The hull carries your vessel name and rotates to heading, or
COG when heading is unavailable. Expand the HUD to see the server coordinate,
HDG, COG, SOG, reported accuracy, and DEVICE↔SK—the distance between the
device GPS and boat-server fixes. It reads in metres below 1 km and nautical
miles beyond it.
Tap the vessel row to fly the chart to the boat. If the Captain profile has
vessels but none is active yet, AnchorQueen selects the first one.
Choose which position drives the app
Open Settings → NMEA, choose Signal K, then switch on Signal K
Position under Signal K Stream and tap Apply & Connect.
makes the separation visible when the phone is ashore or away from the boat.
Voyage recording, and SafeAnchor calculations. The K vessel replaces the
device marker instead of drawing a second boat at the same coordinate.
active anchor watch is not left without a position.
SafeAnchor has its own radar presentation rather than the chart's GPS HUD, but
it follows the same selected position authority and uses the same named,
directional vessel symbol.
If the link says connected but the vessel or coordinates are missing, follow
Connected, but no Signal K position.
The Command Palette
The search affordance (see [the tab bar](#tab-bar)) opens a full-screen
Command Palette with two tabs you switch between at the top:
seamarks, and your saved waypoints. It keeps a RECENT history that works
offline, a Clear History action, and a Jules filter chip that shows
only the searches Jules ran for you.
you can jump straight to a setting without remembering which tab it lives
on.
With the box empty, the Features tab shows the onboarding-hint features as
a built-in tour of what the app can do.
The chart content rail
The leading edge carries the other plate — the content rail. Same glass,
same grip, but it answers what am I looking at? rather than *what am I
doing?*
It carries one cell per active category, each with a live count badge
for the items currently in view:
SafeAnchor → Past anchorages on the rail);
this cell stays on every chart mode, including the anchor watch, once you
have weighed a first stay
Category cells belong to the chart's Discover
sub-mode. Any category whose viewport count is zero hides itself, so empty
water doesn't clutter the edge; pan back to populated water and the cell
returns.
Tap a cell to open its panel. The panel opens beside the rail in
landscape and as a bottom sheet in portrait — and only one is open at a
time: tapping another category replaces it. The stack of overlapping
floating cards, and the "which card is on top" problem that came with it, is
gone.
The depth legend lives here now. The depth-colour ramp used to run across
the bottom of the chart. It is a cell on this rail instead — tap it for the
ramp, the active palette's name, and a reminder that palettes are changed in
Chart Layers. The bottom band it used to occupy is chart again.
If more categories are active than the edge can hold, the extras pocket
behind the ••• cell exactly as on the [command rail](#camera) — and the
grip behaves identically: drag up or down to align, drag across the chart to
swap the two rails' sides, long-press for Rail options.
Sub-mode bars (bottom)
Several tabs have a frosted-glass pill bar at the bottom showing the tab's
sub-modes:
The selected sub-mode is highlighted. Tap a pill to switch instantly.
Clean export
The data tools — crosshair, ruler, own-ship, Clean and
Layers — are cells on the [command rail](#camera) now. The separate
bottom-right QuickActions panel they used to live in is gone, so there is no
second floating group to hunt for.
Some chart shots need to be saved without app chrome on top. Tapping Clean
— the crossed-out eye, next to Charts on the command rail — removes
the tab bar, the sidebar, the content rail, every panel and the rest of the
overlays. What survives is the command rail itself, cut down to four cells:
the grip, a lit eye that brings the chrome back, PDF, and
Image.
PDF hands you an A4-landscape chart of the area you are looking at;
Image hands you the same view as a full-resolution PNG. Both open the
system share sheet, so you can print, mail, or save to Files.
Clean export works on all three chart tabs — SeaTracker,
Capt's Notebook and Merconi. It is
deliberately unavailable on SafeAnchor: an armed anchor
watch keeps its chrome at all times.
The title block and the data-source attribution are rendered into the
exported PDF or PNG — they are part of the saved file, not an always-on
overlay you see on screen. Tap the eye again to bring the chrome back.
If something goes wrong
on a short screen the tools move in there first. Rotating the device gives
the rail more room. The [tab bar](#tab-bar) moves to the side in landscape.
switch to SeaTracker and tap Sefer / Voyage to use it.