SeaTracker haritası — Rota, Keşif, Sefer
SeaTracker sekmesi, AnchorQueen'in kalbindeki seyir haritasıdır. Harita asla
kaybolmaz — sekme değiştirip geri döndüğünüzde yakınlaştırmanız ve konumunuz
tam olarak bıraktığınız yerdedir.
Haritanın altında üç alt modlu bir kapsül çubuğu vardır:
Rota — Keşif — Sefer.
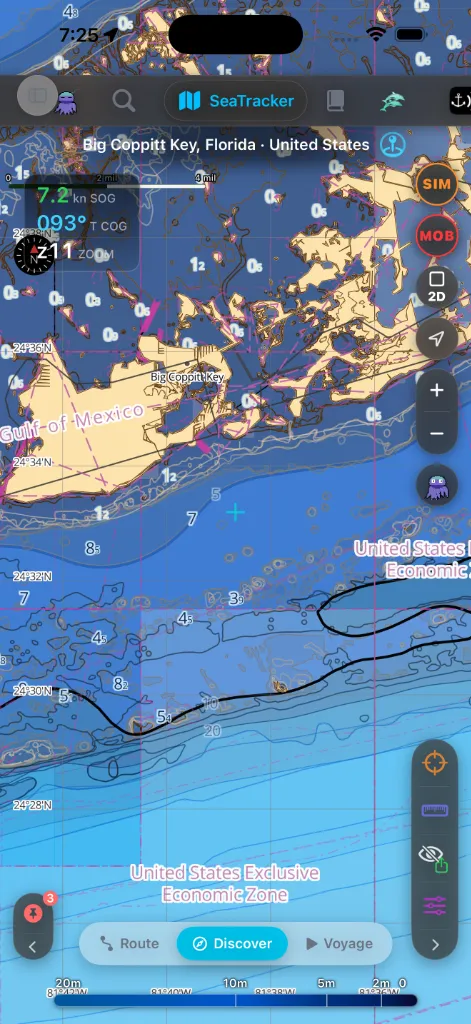
Keşif
Varsayılan mod. Harita gezinmeniz için sizindir.
gösterir.
şamandıralar, deniz işaretleri, limanlar, demirleme yerleri, tehlikeler,
batıklar, fener sektörleri, AIS tekneleri, deniz canlıları, dalış
noktaları, balıkçılık takibi, okyanus verileri, Wikipedia makaleleri ve
kendi kaptan işaretleriniz.
artı imlecin altındaki derinliği gösterir.
çizgi olarak çizer — trafiği keserken kullanışlıdır. Bunu Harita
Katmanları → Gezinme altında açıp kapatabileceğiniz (varsayılan olarak
açık) bir katmandır; orada rengini ve çizgi stilini de ayarlayabilirsiniz.
uzun basın.
Bir alanı öğrenmek, bir demirleme yerini keşfetmek ya da ilgi noktalarına göz
atmak için Keşif'i kullanın.
Canlı cihaz okuması
Bir NMEA cihaz kaynağı bağladıysanız (bir Wi-Fi ağ geçidi veya bir
Bluetooth modülü — bkz. [Ayarlar → Demir Nöbeti →
Cihazlar](settings.html#anchor-watch)), GPS HUD canlı bir cihaz bölümü
kazanır. Yalnızca bir kaynak bağlıyken görünür; dahili GPS'li bir cihazda HUD
değişmez.
YENİDEN DENE (kehribar) veya SİNYAL YOK (kırmızı) — taşıma katmanını
(TCP / UDP / BLE) ve son verinin ne kadar önce geldiğini gösterir. Akış
sustuğunda yaş yukarı saymaya devam eder; bu yüzden donmuş bir "12 sn önce"
ağ geçidinin göndermeyi durdurduğunun işaretidir.
kırmızı renk kodlu), rüzgârı (açısıyla birlikte görünür veya gerçek hız)
ve — kartı genişletmek için dokunduğunuzda — pruva yönünü, suya göre
hızı ve deniz sıcaklığını okur. Yalnızca cihazlarınızın gerçekten
gönderdiği değerler görünür.
eğilim mini grafiklerini de ortaya çıkarır; böylece bir bakışta deniz
tabanının sığlaştığını ya da esintinin arttığını görebilirsiniz.
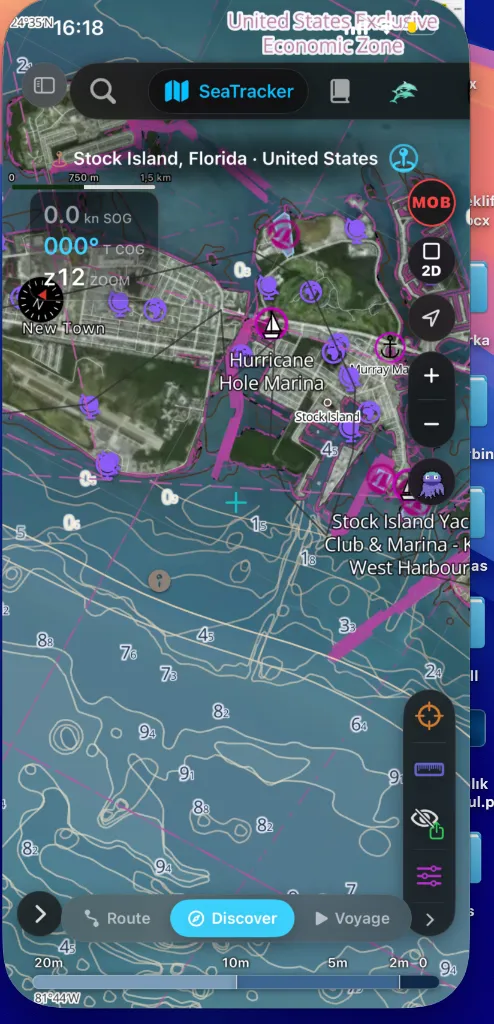
Uydu ve Hibrit Taban Haritası
Kıyı sularının eksiksiz fotoğrafik ve metrik bir görünümünü elde etmek için doğrudan vektör seyir haritası katmanlarınızın altına yüksek çözünürlüklü uydu görüntülerini bindirebilirsiniz.
Bunu etkinleştirmek için:
stilini seçin.
Su Derinlikleri seçeneklerini açın.
Bu, yüksek hassasiyetli iskandilleri ve derinlik tehlike çizgilerini doğrudan gerçek dünyadaki kıyı yapılarının üzerine bindirir; böylece tanımadığınız marinalara (Stock Island, Florida'daki Hurricane Hole Marina gibi) giriş kanallarını planlamak son derece kolaylaşır.
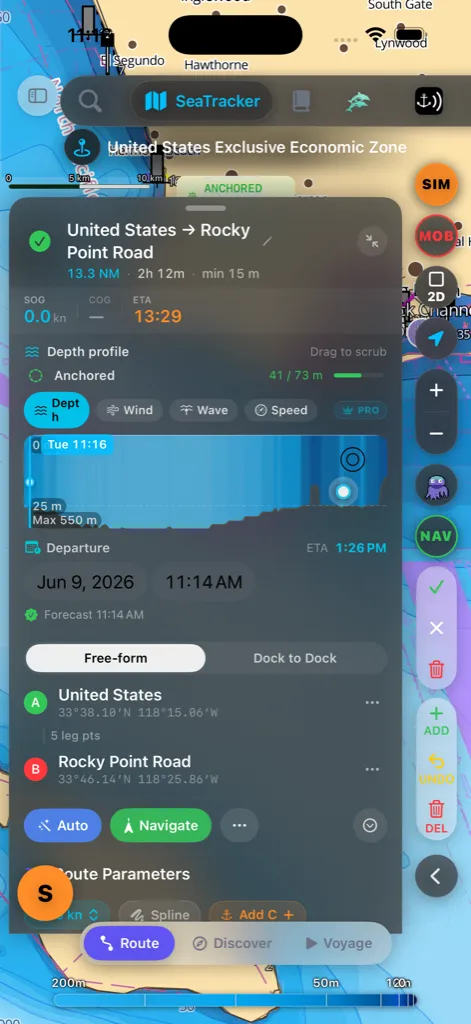
Rota
Rota modu HUD'un yerine altta Rota Paneli'ni koyar.
"oluştur" veya "Tamam" adımı yoktur. Bir başlangıç (A) ve bir bitiş (B) var
olduğu an uygulama, yüksek performanslı Hibrit A*-APF (Yapay Potansiyel
Alan) Yol Bulma Motorumuzu kullanarak sığlıkların ve kara engellerinin
etrafından seferinizi otomatik planlar. Bu, noktaları nasıl yerleştirseniz
de geçerlidir: haritaya dokunarak, uzun basarak ya da ADD düğmesini
kullanarak.
aşağı sürükleyin. Üç yükseklik arasında oturur — ince bir bakış, bir
yarım sayfa ve tam — ve tek sürekli bir sürükleme tamamen tama
kadar gider; artık iki kez sürüklemeniz gerekmez.
önizler — herhangi bir bölümü incelemek için sürükleyin.
düğmelerinin altında) küçük bir ADD / UNDO / DEL kapsülü belirir:
ADD artı imlece bir yol noktası bırakır (ikinci ADD rotayı otomatik
planlar), UNDO sonuncuyu kaldırır, DEL en yakını kaldırır. Bir yol
noktasını taşımak için doğrudan harita üzerinde sürükleyin. Kapsül yalnızca
serbest biçimlidir — rotayı iki rıhtım yuvasından oluşturduğunuz
Rıhtımdan Rıhtıma modunda gizlidir.
teknenizin mevcut konumuna kıvrılmaz. Kameranın teknenizi izlemesini
istiyorsanız izleme düğmesini kullanın.
Hibrit A*-APF ve Gevşetme Şelalesi
Yönlendirme motoru, mutlak arayüz akıcılığı için ana iş parçacığının dışında çalışır ve yolları üç mantıksal aşamada çözer:
* Katı Mod: Rotanın tamamı boyunca tam su çekimi + güvenlik açıklığını zorunlu kılar.
* Sığ Mod: Katı başarısız olursa planlayıcı, uç noktalara yakın açıklık kurallarını gevşetir ve sizi olası su çekimi riskine karşı uyarır.
* Azami Çaba Modu: Bir yönlendirme hatasıyla durmak yerine sürekli bir rota üretildiğinden emin olmak için rıhtımlara yakın açıklık sınırlarını tamamen gevşetir.
Rıhtımdan Rıhtıma
Rota Paneli'nin üstündeki çift yönlü bir anahtar, rotayı nasıl
oluşturacağınızı seçer:
haritaya dokunun ya da uzun basın; uygulama her çift arasında rota çizer.
bir A → B akışı.
Rıhtımdan Rıhtıma modunda panel iki yuva gösterir:
adıyla bulun. Mevcut konumunuzu kullanmak için konum simgesine ya da en
yakın limana bırakmak için feribot simgesine de dokunabilirsiniz.
seçin"). Bir kalkış seçtiğiniz an varış seçici otomatik açılır; böylece
doğrudan gideceğiniz yeri arayabilirsiniz.
Seçici önce limanları ve marinaları listeler, diğer yerler altta yer alır
ve mevcut görünümünüzden uzaklığı gösterir. Her iki rıhtım ayarlandığında
uygulama, tıpkı Serbest biçimde olduğu gibi sığlıkların etrafından aralarında
otomatik rota çizer.
doğrulayabilirsiniz — kalkış (A), tıpkı varış (B) gibi görünümü yeniden
ortalar.
varışı ters çevirin — rota anında yeniden planlanır.
Kaptan Kütüphanesi
Yan menüdeki Capt's Routes girişi Kaptan Kütüphanesi'ni açar —
kaydettiğiniz veya topladığınız her şeyi yöneteceğiniz, aranabilir tek yer:
için birine dokunun; silmek için kaydırın. Tam eylem menüsü için uzun basın:
Haritada Görüntüle, Seyri Başlat, Çoğalt, Yönü Ters Çevir,
GPX Dışa Aktar ve Sefer Planı (PDF) — yazdırılabilir A4 sefer planı,
doğrudan listeden, ayrıntı sayfası gerektirmeden.
demirleme bekleme süresini düzenlemek için dokunun; kapsam düğmesi haritayı
ona uçurur.
silmek için kaydırın.
sefer izleri. İstatistikler ve ETA hesaplayıcısı ile tam sefer günlüğü için
birine dokunun.
Bir arama kutusu, sıralama menüsü ve canlı sonuç sayısı listenin üzerinde yer
alır. ⋯ Gelişmiş menüsü GPX İçe Aktar ve Klasörleri Yönet
ekler.
Yatay modda kütüphane sağ ayrıntı panelinde açılır; böylece harita
görünürdeyken rotaları yönetebilirsiniz; dikey modda bir sayfa olarak açılır.
Sefer
Sefer, etkin seyirdir. Tek bir basılı tutma, harita üzerindeki bir noktayı,
sonra başlatmayı seçtiğiniz planlanmış bir sefere dönüştürür. Birkaç sefer
yapana kadar harita üzerindeki bir ipucu size hareketi hatırlatır.
bir halka dolar; tamamlanana kadar tutun.
noktaya (B) sığlıkların ve karanın etrafından rota çizerken canlı ilerleme
gösterir. Planı bırakmak için kapsülün ✕ işaretine dokunun. Bir şey
rotayı engellerse — GPS sabitleme yok, karada bir hedef, tekneye çok yakın
bir nokta — kapsül bunu hemen orada söyler.
kartı belirir ve planlanan yol harita üzerine bir kesik önizleme çizgisi
olarak çizilir — incelemek için serbestçe kaydırın ve yakınlaştırın.
yol noktası varışlarınız ve istatistikler) başlar, derinlik ve hava durumu
grafikleri dolar ve her iki uçta yakındaki harita nesneleri bırakılır.
Planlanan rotayı atmak için Kapat'a dokunun; hiçbir şey başlatılmaz ya
da kaydedilmez.
Başlat ile onayladığınız için, yanlış bir uzun basma asla kendi başına bir
sefer başlatmaz. Her iki uç noktası da en yakın yerlerine göre adlandırılır.
Kart beklerken tekne anlamlı ölçüde hareket etmişse, Başlat'a dokunmak
seyir başlamadan önce gerçekte bulunduğunuz yerden sessizce yeniden plan
yapar; böylece rota her zaman pruvadan başlar — birkaç dakika önce bulunduğu
yerden değil.
Zaten seyrediyor musunuz? Bir sefer çalışırken yapılan bir basılı tutma
yenisini başlatmaz — o noktaya bir yol noktası ekleme önerir ve onayınız
beklenirken mevcut konumunuzdan oradan geçecek şekilde yeniden rota çizer.
Etkin Seyir HUD'u

Seyrederken, haritanın üstünde dokunarak geçilen dört bölümlü tek bir kart yer
alır:
yer hızı okumaları.
rotadaki konumunuz.
Hangi grafiğin gösterileceğini değiştirmek için tür düğmelerine dokunun.
Derinlik her zaman ücretsizdir; Rüzgâr, Dalgalar ve Gel-git
tahmin grafikleri bir Pro özelliğidir — Ücretsiz hesapta o şeritler bir eğri
yerine kilitli bir "Pro özelliği" yükseltme önerisi gösterir. Bunların
kilidini açmak için Mağaza'ya bakın. Rüzgâr, hortumu
rüzgâr çizgisinin üzerine daha soluk kesik bir çizgi olarak çizer ve rüzgâr
yönü oklarıyla birlikte gelir. Her grafik, rota boyunca canlı tahmin
verilerini, yol noktası işaretlerini ve bir mesafe ölçeğini gösterir.
Beyaz bir nokta mevcut konumunuzu izler; grafiği sürükleyerek harita
üzerindeki rota boyunca beyaz bir noktayı tarayın — bir süre sonra canlı
konumunuza geri kıvrılır. Gel-git, rotanız boyunca öngörülen liman
gel-git yüksekliğini, bir ortalama deniz seviyesi çizgisi etrafına çizerek
gösterir (eğri, su alçaldığında çizginin altına iner); bir alan için gel-git
tahminlerinin bulunmadığı yerde grafik tahmin yerine bir boşluk gösterir.
Önceki veya sonraki yol noktasına geçmek için HUD başlığındaki ‹ ›
oklarını kullanın; kısa bir afiş yeni hedefi onaylar. HUD başlığındaki
küçült düğmesi (⤡) tüm kartı küçük bir NAV · WP çipine daraltır;
geri getirmek için çipe dokunun. Yer adı rozeti doğrudan HUD'un altına
sıkışır; böylece haritanın geri kalanı açık kalır.
Alttaki komut penceresi (derinlik tarayıcı + oynatma denetimleri) üç
boyuta sahiptir — tam → kompakt → küçültülmüş arasında geçiş yapmak için
aşama düğmesine dokunun; ihtiyacınız olmadığında harita alanı açın.
Yatay modda HUD, asla haritayı yemesin diye ön tarafa genişlik sınırlamasıyla
yerleştirilir ve ondan açtığınız paneller (rota ayrıntısı, sefer planı)
haritayı kaplamak yerine sağ ayrıntı sütununa yerleşir — tıpkı
[Kaptan Kütüphanesi](#captains-library)'ndeki bölünmüş davranış gibi.
Durdurma ve yeniden yönlendirme
kırmızıya döner ve STOP yazar. Buna dokunmak, kazara bir dokunuş
rotanızı düşürmesin diye seyri bitirmeden önce sizden onay ister.
belirirse, kazanacağınız zamanı ve mesafeyi gösteren bir afiş kayar.
Geçmek için Yeni rotayı kabul et'e ya da Mevcudu koru'ya dokunun —
hiçbir şey yapmazsanız birkaç saniye sonra kendini kapatır.
Bir yer bulma
Arama panelini açmak için üst çubuktaki arama simgesine dokunun. İki
sekmesi vardır:
Harita Araması nelere bakar
Tek bir arama kutusu her şeyi aynı anda sorgular ve sonuçları geldikleri yere
göre, önce kendi verileriniz olacak şekilde gruplandırır:
| Grup | Ne bulur | Nereden gelir |
|---|---|---|
| Kaptan İşaretleri | Kaydettiğiniz iğneler, dalış noktaları ve kaydedilmiş makaleler | Cihazınızda |
| Rotalar | Kaydettiğiniz rotalar (ada göre) | Cihazınızda |
| Yol Noktaları | Adlandırdığınız yol noktaları | Cihazınızda |
| AIS Tekneleri | Yakınınızdaki canlı gemiler; ada, MMSI, çağrı işareti, türe veya hedefe göre | Canlı AIS akışı |
| Limanlar | Yerleşik veritabanından marinalar ve limanlar | Cihazınızda |
| Deniz İşaretleri | Haritalı şamandıralar, bikonlar ve deniz fenerleri | Cihazınızda |
| Yerler | Koylar, adalar, kasabalar, belirgin işaretler, adresler | OpenStreetMap (çevrimiçi) |
| Yerler (Google) | Marinalar, işletmeler ve ada göre ilgi noktaları (mevcut olduğunda) | Google Places (çevrimiçi) |
| Limanlar (Çevrimiçi) | Dünya çapındaki marina/liman veritabanı — olanakları, barınağı ve yaklaşım derinliğiyle binlerce marina | OpenSeaMap (çevrimiçi) |
| Keşifler | Yakınınızdaki yerler hakkında Wikipedia makaleleri | Wikipedia (çevrimiçi) |
Kendi verileriniz ve canlı AIS, siz yazdıkça anında görünür. Çevrimiçi
gruplar bir an sonra katılır — üç harf yazdığınızda başlarlar ve uygulama,
her tuş vuruşunda bir istek göndermesin diye ulaşmadan önce yazmanızda kısa
bir duraklamayı bekler. Çevrimiçi sonuçlar önbelleğe alınır; böylece son
bir aramayı tekrarlamak anında geri döner ve daha sonra çevrimdışı olduğunuzda
da çalışır.
Bir sonucu okuma
Her satır adı, kısa bir alt başlığı (tekne ayrıntıları, rota uzunluğu, liman
olanakları vb.) ve — uygulama konumunuzu bildiğinde — deniz mili cinsinden
mesafeyi gösterir. Küçük kesik kareli bir simge, yerin bilinen bir sınırı
olduğu anlamına gelir; bu nedenle oraya uçmak tek bir nokta yerine tüm alanı
çerçeveler.
Haritayı oraya uçurmak ve adıyla etiketlenmiş bir iğne bırakmak için bir
sonuca (ya da → düğmesine) dokunun; böylece kamera yerleştikten sonra konum
işaretli kalır. Temizlemek için iğneye dokunun. Bir rota sonucuna
dokunmak o rotayı ortaya çıkarır ve uçtan uca çerçeveler; bir Wikipedia
sonucuna dokunmak makale panelini de açar.
Son aramalar
Kutu boşken panel Son aramalarınızı gösterir. Her satır, onu kimin
çalıştırdığını gösteren küçük bir rozet taşır:
yer bulmasını istediğinizde tam olarak yukarıda listelenen kaynakları arar;
böylece bulduğu bir marina dokunmaya hazır olarak buraya gelir.
Yalnızca Jules'un bulduğu yerleri göstermek için listenin üzerindeki ✦
Jules çipine dokunun. Geçmişi Temizle son listeyi ve çevrimdışı
önbelleği siler.
> Tüm çevrimiçi kaynaklar seyir için değildir ve bağlantı olmadan
> kullanılamayabilir — haritalarınız, işaretleriniz, rotalarınız ve yerleşik
liman ile deniz işareti verileriniz her zaman çevrimdışı çalışır.
Harita stilini seçme
Taban haritası stili ve derinlik paleti haritanın kendisinde yer alır — sağ
alt köşeden Harita Katmanları sayfasını açın ve bunları Haritalar
sekmesi altından seçin (bkz. [Harita Katmanları](#layers)). Seçim geneldir ve
açılışlar arasında kalır; yeni kurulum varsayılanları (Nautica Day taban
haritası + ters NOAA paleti) demirde gündüz netliği için ayarlanmıştır.
Ayarlar'daki tek harita-görünümü denetimi, iOS
açık/koyu modu değiştirdiğinde paleti gündüz ve gece eşleri arasında çeviren
Cihaz Görünümüyle Otomatik Eşleştir anahtarıdır — taban haritasını seçmez.
Harita Katmanları paneli
Harita Katmanları sayfası her örtü katmanının açılıp kapatıldığı yerdir.
Uzun bir listeyi kaydırmak yerine doğrudan istediğinize atlayabilesiniz diye
üstte beş sekmeye düzenlenmiştir:
sağlayıcılar), derinlik paleti teması, Derinlik ve Batimetri grubu
(Derinlik Eğrileri ve Derinlik Poligonları varsayılan olarak
açıktır; böylece yeni bir kurulum okunabilir bir batimetri haritasıyla
açılır; daha ağır olan Su Derinlikleri / EMODnet dolgusu siz açana kadar
kapalı kalır ve harita temasını değiştirmek, gizlemişseniz eğrileri ve
poligonları yeniden gösterir) ve vektör taban haritası alt katmanları
(yollar, binalar, etiketler, ilgi noktaları, sınırlar). Haritanın nasıl
görüneceğini ayarlamak için buradan başlayın.
örtü katmanları (deniz işaretleri, sınırlar, denizel bölgeler,
[trafik ayırım düzenleri](#tss), gümrük, raster haritalar) ve bir bölge
kurarak kilidini açtığınız çevrimdışı S-57 ENC yığını (iskandiller, kanallar,
tehlikeler, deniz tabanı).
işaretleri, liman veritabanı, hava durumu ve keşif katmanları (deniz
canlıları, dalış noktaları, balıkçılık etkinliği, okyanus verileri).
bağlantı durumuyla AIS API akışı (aisstream.io / VesselAPI) ve
Filo (Uzaktan Senkronizasyon) grubu — bir SafeAnchor uzaktan kanalı
üzerinden canlı konum paylaşan kaptanlar; kanal adını ve kaç teknenin
senkronize olduğunu gösteren bir özetle. Akış her açılışta varsayılan
aisstream.io sağlayıcısında başlar; VesselAPI yalnızca otomatik bir
yedek olarak (aisstream.io erişilemez kaldığında) veya kendiniz seçtiğinizde
kullanılır ve bu seçim yalnızca oturum boyunca sürer — bir sonraki açılış
aisstream.io'ya döner. Kaydırdığınızda veya yakınlaştırdığınızda, ekranda
zaten bulunan gemiler yerinde kalırken akış arka planda yeni alana yeniden
abone olur — sönüp yeniden yanmak yerine yerinde yenilenirler.
yakın bir bölüm; baktığınız yere yakın genel vericide yayın yapan diğer
AnchorQueen kaptanlarının canlı konumları için. Haritada bir kehribar
halkayla gösterilirler (böylece onları, camgöbeği olan kendi filonuzdan
ve halkası olmayan ham AIS'ten ayırt edebilirsiniz) ve siz yakınlaştırdıkça
canlı güncellenirler. Bir özet, görüş alanında kaçının olduğunu gösterir.
Canlı akışı açık tutmak veri kullandığından kapalı başlar — meşgul bir koy
çevresinde kimin demirlediğini görmek istediğinizde açın.
izler, kıvrılma çizgisi, demir geçmişi) artı demir nöbeti halkalarının,
kendi-tekne çizgilerinin ve mod başına artı imleç renklerinin görünümü.
Sol üst köşedeki şimşek menüsü, herhangi bir sekmeden ulaşılabilen
Tüm Katmanları Göster ve Tüm Deniz İşaretlerini Gizle kısayollarına
sahiptir.
Trafik Ayırım Düzenleri (TSS)
Meşgul sularda gemiler Trafik Ayırım Düzenleri üzerinden yönlendirilir —
zıt trafik akışları için, dışında kalmanız gereken bir ayırım bölgesiyle
bölünmüş tek yönlü şeritler. AnchorQueen IMO/IHO düzen verisini çevrimdışı
taşır ve harita üzerine çizer; katman Harita Katmanları → Haritalar (Seyir)
altında yer alır ve varsayılan olarak açıktır; çünkü
denizin kuralları (COLREGS Kural 10) bu bölgelere özen
göstermenizi gerektirir.
Haritada şeritler trafiğin hangi yöne aktığını gösterir; ayırım
bölgesi zıt şeritler arasındaki şerittir.
Seyir halindeyken AnchorQueen, yakınında olduğunuz herhangi bir düzene karşı
izinizi izler ve bir afiş kaldırır:
girmeden önce şeridin hangi yöne aktığını gözden geçirin.
mümkün olduğunca dik açıya yakın geçmenizi söyler — 90°'ye doğrultun.
gidiyorsunuz, bir Kural 10 ihlali. Rotanızı değiştirin.
Bir alarm canlıyken afiş ekranda her zaman gösterilir; uygulama arka
plandayken bir işletim sistemi bildirimi de gönderilir. Demir atmak özel bir
durumdur — Kural 10(g) bunu bir ayırım bölgesi içinde yasaklar — ve demir
nöbeti tarafından ele alınır, bkz.
SafeAnchor → Bir ayırım bölgesinde demirlemek.
Alarmları (katman kalır) [Ayarlar → Seyir → Güvenlik
Alarmları](settings.html#safety-alarms) altından kapatın.
S-52 Harita İşleme ve Yerel Vektör Karoları
Özünde AnchorQueen, tamamen çevrimdışı olarak son derece etkileşimli, 60fps'lik bir harita deneyimi sunmak için tasarlanmış özelleştirilmiş bir MapLibre GL Vektör Derleme Motoru kullanır.
* S-52 Gündüz ve Gece Haritaları: IHO (Uluslararası Hidrografi Örgütü) Sunum Kütüphanesi standartlarına uygun olarak uygulama, S-57 ENC öznitelik özelliklerini (derinlik eğrileri, fener sektörleri, şamandıralar, kısıtlı alanlar) özel biçimlendirme sayfaları (Nautica Day ve Nautica Night) kullanarak dinamik olarak çevirir.
* Çevrimdışı Vektör MBTiles: Ham batimetri, kara hatları ve denizel sınırlar, optimize edilmiş matematiksel sadeleştirmeler (tippecanoe) kullanılarak son derece sıkıştırılmış yerel MBTiles paketlerine (adminland.mbtiles, maritimezones.mbtiles, admin_places.mbtiles) derlenir. Bu, yerleşik depolamayı gigabaytlarca ham GeoJSON'dan birkaç yüz megabayta düşürerek mobil cihazlarda bellek-yetersiz çökmelerini önler.
* Yerleşik SDF Glifleri: Tamamen çevrimdışı bir İşaretli Mesafe Alanı (SDF) yazı tipi paketi; Latin, Kiril, Yunan ve Türk karakter setlerini kapsayarak herhangi bir eğim ve yakınlaştırma açısında gerçek zamanlı yazı tipi işlemeyi mümkün kılar.
* Omurga İskandil Sorguları: Artı imlece dokunmak, imlecin altındaki iskandilleri ve fiziksel tehlikeleri sorgulamak için yerel bir uzamsal Kd-Tree sorgusunu tetikler. Bu işlem, hızlı kaydırmalarda harita takılmasını önlemek için ana iş parçacığının dışında çalışır.
Bir iz kaydetme
Bir iz kaydetmeye başlamak için haritanın eylem menüsünden İz kaydı
sayfasını açın. İzler, saklayabileceğiniz, paylaşabileceğiniz veya daha
sonra Capt's Notebook'tan yeniden oynatabileceğiniz
GPX dosyaları olarak kaydedilir.
Çevrimdışı karolar
Seyrettiğiniz alan için bir karo paketi indirmek üzere haritanın eylem
menüsünden Önbellek sayfasını açın. Mağaza'dan kurulmuş bir
bölgeyle alan tamamen çevrimdışı kullanılabilir hale gelir.
Bir şeyler ters giderse
kurulu eşleşen bölgenizin olduğundan emin olun. Bkz.
çekiminiz için çok sığ suda; noktayı daha derin suya itin ve tekrar deneyin.
ayarladıktan sonra Sefer'i yeniden çalıştırın.